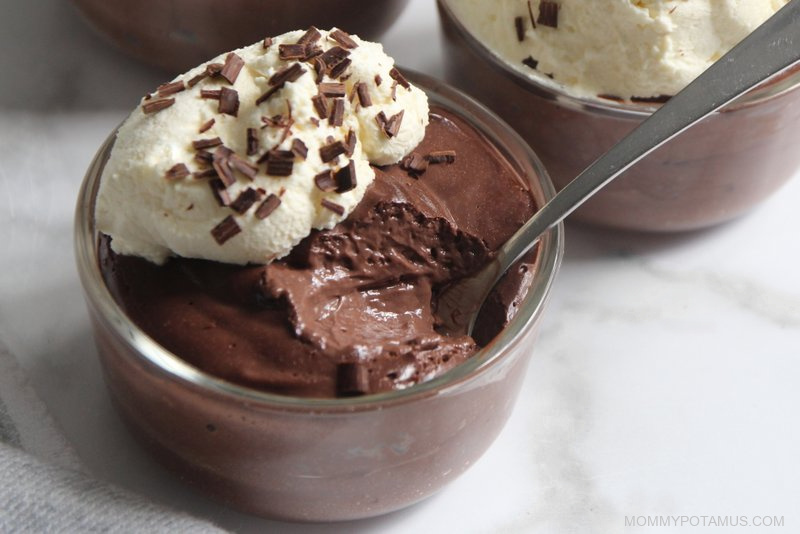
The Creamiest Hard-Boiled Egg Chocolate Pudding (High Protein)

The Creamiest Hard-Boiled Egg Chocolate Pudding (High Protein)

If someone handed me a bowl of this chocolate pudding and asked me to guess the secret ingredient, hard-boiled eggs wouldn’t even make the list.

Once everything gets whirled together in a blender, the eggs somehow “disappear” into an incredibly smooth, rich chocolate pudding that my whole family loves.

It’s not “surprisingly good considering there are eggs in it” – it’s ACTUALLY good . . . possibly the best chocolate pudding I’ve ever made.

There’s no eggy flavor and no complicated technique. Just silky, chocolatey goodness . . . with a lot of bonus protein. 🙂

Okay, But Why Put Eggs In Pudding?

I realize hard-boiled eggs and chocolate pudding sound like two foods that should stay very far away from each other, but there’s actually a lot to love about this combination.

Traditional homemade pudding usually involves heating milk, sugar, and cocoa on the stove, then using cornstarch (or arrowroot), egg yolks, or another thickener to create a creamy texture.

This version is so much easier.

Hard-boiled eggs provide the structure and creaminess, while cocoa powder, vanilla extract, and maple syrup provide the sweet chocolatey goodness.

Everything goes straight into the blender, so there’s no tempering eggs and no whisking over the stove.

And because the base is made with whole eggs instead of milk and sugar, it’s naturally higher in protein than most traditional chocolate pudding recipes. (You know how much I love that.)

The Trick To Making It Taste Like Pudding

I know, “trust me” is doing a lot of heavy lifting with this recipe, but I served this to everyone in my family and none of them could tell it contained eggs.

That said, I do have a couple of tips for you.

First, use a high-speed blender if you have one. You want the hard-boiled eggs blended so thoroughly that there aren’t any tiny bits left behind.

Second, for the silkiest pudding, let your blender run longer than you think it needs to.

You’re not just combining the ingredients – you’re trying to completely emulsify the eggs into the mixture.

If your pudding seems too thick, add milk a tablespoon or two at a time. If it seems a little thin, keep in mind that it will firm up in the refrigerator.

And if you can detect even a hint of egg flavor while it’s still warm from blending, chill it before making any adjustments. The chocolate flavor comes through much more clearly once everything is cold.

🍓 August 8–12 Only

Quick interruption before we get back to chocolate pudding. 🙂

Paleovalley is celebrating their anniversary with up to 35% off everything in the store, plus a free mystery gift with every order.

It’s a good time to stock up on their Superfood Bars, Vanilla Bone Broth Protein, beef sticks, whole food supplements, and other snacks + pantry staples.

Shop The Sale + Get A Free Gift

Now, back to the recipe. 🙂

What You’ll Need

Hard-boiled eggs – You’ll need six peeled eggs. Use fully cooked hard-boiled eggs rather than soft-boiled eggs because you want the yolks completely set before blending.

Milk – I usually use whole milk, but if you’re dairy-free you can use coconut milk or another non-dairy milk.

Unsweetened cacao powder or cocoa powder – I use whichever one I have on hand at the moment.

Maple Syrup – Adds sweetness while blending in completely, so the pudding stays smooth and silky.

Vanilla extract – To round out the flavor.

A pinch of salt – Optional, but recommended. A little salt helps the chocolate and vanilla really “pop.”

Is This Good For Meal Prep?

Yes. This pudding keeps well for 3–4 days in the fridge, so I often make a double batch and scoop it into individual glass jars for my family to grab when they need a snack.

Hard-Boiled Egg Chocolate Pudding Recipe

This silky, rich recipe is very possibly the best chocolate pudding I’ve ever made. It’s easy, rich in protein, and can be made in advance for quick snacks throughout the week.

Keyword gluten-free, dairy optional

Prep Time 5 minutes Chilling time 1 hour

Author Heather Dessinger, FDN-P

  • 6 hard boiled eggs (peeled)
  • ½ cup whole milk or non-dairy milk
  • ⅓ cup maple syrup (or more to taste)
  • ¼ cup unsweetened cacao powder or cocoa powder
  • 1 tsp vanilla extract (how to make it)
  • pinch of salt (optional)
  • Add all ingredients to a high-speed blender.

  • Blend until completely smooth and creamy, stopping to scrape down the sides if needed.

  • Taste and add an extra tablespoon or two of sweetener if desired.

  • Transfer to individual serving jars, a large mason jar, or a covered container.

  • Refrigerate until thoroughly chilled. (At least one hour, but preferably longer.)

  • Serve plain or topped with whipped cream, berries or shaved chocolate.

The total volume of the finished pudding can vary from about 2 to 2.5 cups, depending on how much air is incorporated during blending. For the nutrition information below, one serving is ¼ of the finished batch, regardless of its total volume.
Nutrition calculation is based on whole milk (instead of non-dairy milk) and cacao powder (instead of cocoa powder). 

Calories: 222kcal | Carbohydrates: 24g | Protein: 11g | Fat: 10g | Saturated Fat: 3g | Polyunsaturated Fat: 1g | Monounsaturated Fat: 4g | Cholesterol: 283mg | Sodium: 137mg | Potassium: 284mg | Fiber: 2g | Sugar: 19g | Vitamin A: 439IU | Calcium: 111mg | Iron: 2mg

✋ Before You Go, Grab This Free Midlife Guide

If you’ve ever found yourself thinking, “Why doesn’t my body respond the way it used to?” . . . this guide was written for you.

Midlife can change the rules for everything from sleep and energy to workouts, recovery, body composition, and more. Knowing what’s changing can help you let go of strategies that no longer fit – and start focusing on what supports your body now.

Inside, I’ll walk you through 10 things I wish I’d known sooner, so you can make more sense of what you’re experiencing and get clearer about where to go from here.

Enter your email below and I’ll send it right over. You’ll also receive my weekly newsletter with practical wellness tips, recipes, and new guides like this one.
Share with a friend! 👇

Tags: , , , , , ,
egg bake

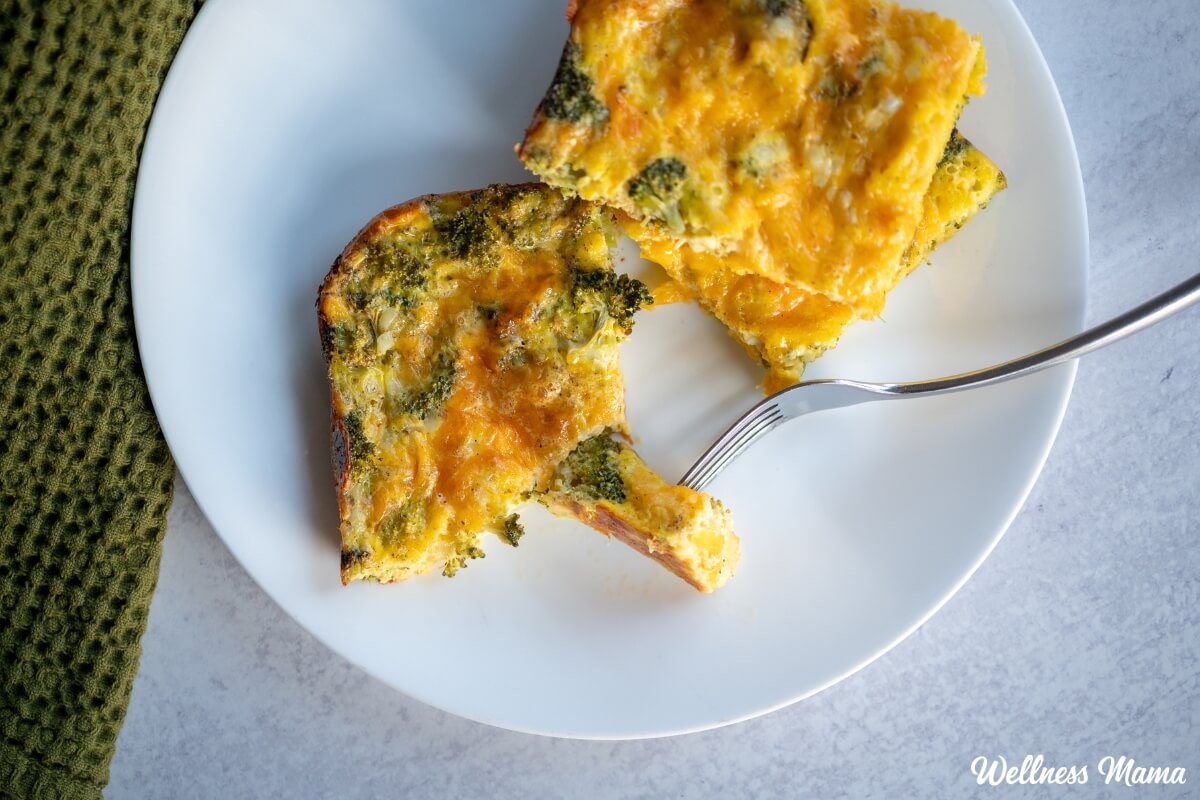
Broccoli Cheddar Egg Bake (Easy High-Protein)

I love having simple breakfast recipes I can make ahead for busy mornings. While smoothies and overnight oats have their place, I also try to prioritize protein in the mornings. This broccoli  cheddar egg bake is a great way to do that. It’s one of those recipes that’s almost effortless to throw together but everyone in my family is a fan. 

The best part is that it only takes a few minutes to mix everything together before the oven does the rest of the work. I can prep it while I’m making coffee, then let it bake while I dive into my morning routine. It also reheats beautifully. I’ll often make dishes like this on the weekend and enjoy leftovers for breakfast or lunch throughout the week.

Why I Love This Broccoli Cheddar Egg Bake

Egg casseroles have always been one of my favorite ways to meal prep because they’re incredibly versatile. This version combines eggs with cottage cheese for an extra boost of protein and a creamy texture without needing heavy cream. The shredded cheddar adds plenty of flavor, while the broccoli brings color, fiber, and nutrients.

I also appreciate that this recipe uses simple ingredients I almost always have on hand. Frozen broccoli works just as well if that’s what you have, making it easy to pull together without a special grocery trip. The seasonings are simple too, allowing the cheese and broccoli to really shine.

This breakfast casserole is naturally gluten-free and works well for everything from weekday breakfasts to weekend brunches. I also like serving it with fresh fruit, sliced avocado, or roasted potatoes for a more complete meal. Since it makes several servings, it’s an easy option when I’m feeding a crowd (like my kids!) or simply trying to get ahead on meal prep.

Tips for the Best Egg Casserole

Thankfully, this recipe is pretty forgiving. Whisking the cottage cheese into the eggs helps create a smooth, fluffy texture, and the broccoli cooks perfectly right in the casserole without getting mushy. Letting the bake rest for a few minutes before slicing also helps everything set, making it easier to serve neat portions.

Leftovers store well in the refrigerator for several days, making this one of my favorite make-ahead breakfasts. I simply warm up a slice in the oven, toaster oven, or air fryer for a quick meal that tastes almost as good as when it was freshly baked.

Whether you’re meal prepping for the week, hosting brunch, or just looking for a nourishing breakfast that doesn’t require standing over the stove, this broccoli cheddar egg bake is a recipe worth keeping on repeat. It’s simple, filling, and made with wholesome ingredients that help make busy mornings a little easier.

Broccoli Cheddar Egg Bake

This delicious egg bake is fully of cheesy broccoli flavor. An easy breakfast that’s dump and go!

  • Preheat the oven to 350°F and grease a 9×13-inch baking dish.

  • In a large bowl, whisk together the eggs, cottage cheese, salt, pepper, garlic powder, and onion powder until smooth.

  • Stir in the broccoli and cheddar cheese.

  • Pour the mixture into the prepared baking dish and spread evenly.

  • Bake for 40–45 minutes, or until the center is set and a knife inserted in the middle comes out clean.

Nutrition Facts

Broccoli Cheddar Egg Bake

Amount Per Serving (1 serving)

Calories 383
Calories from Fat 234

% Daily Value*

Fat 26g40%

Saturated Fat 12g75%

Trans Fat 0.04g

Polyunsaturated Fat 3g

Monounsaturated Fat 7g

Cholesterol 420mg140%

Sodium 889mg39%

Potassium 372mg11%

Carbohydrates 7g2%

Fiber 1g4%

Sugar 3g3%

Protein 30g60%

Vitamin A 1308IU26%

Vitamin C 39mg47%

Calcium 421mg42%

Iron 2mg11%

* Percent Daily Values are based on a 2000 calorie diet.

  • Let rest for 5 minutes before slicing and serving.
  • Refrigerate leftovers in an airtight container for up to 4 days.

Are you an egg casserole fan? What are some of your favorite ingredients to include? Share below!

Tags: , , , , ,
Homestead Blog Hop - Homestead tips, ideas, animal care, and recipes every Wednesday

Homestead Blog Hop 589 – Make Egg Roll Bowls and Muffins

Welcome to Homestead Blog Hop, a weekly gathering for homesteaders and simple living enthusiasts to share DIY projects, from-scratch recipes, and creative inspiration. This week’s hop features cozy homesteading tips, along with practical ideas that celebrate handmade living and self-sufficiency.

Whether you’re looking for seasonal crafts, homemade treats, or encouragement on your homesteading journey, you’ll find plenty of inspiration to carry into the new year. Grab a cup of tea, explore the featured posts, and join us in sharing your own homestead creations.

Meet Your Homesteading Hosts

We’re Kelly from Simple Life Mom, Liz from The Cape Coop, Natasha from Houseful of Nicholes, and Laurie from Ridgehaven Homestead. Together, we’re passionate about from-scratch living, simple ingredients, frugal habits, and intentional homesteading. We’re delighted to host the Homestead Blog Hop, where you can find fresh inspiration each week for DIY projects, homemade recipes, and practical simple living ideas.

Follow Us for More Homestead Inspiration

Natasha – Houseful of Nicholes
Facebook | Pinterest | X | Instagram

Laurie – Ridge Haven Homestead
Facebook | Pinterest | Instagram

Liz – The Cape Coop
Facebook | Pinterest | X | Instagram

Kelly – Simple Life Mom
Facebook | Pinterest | X | Instagram

FEATURED POSTS from the Last Homestead Blog Hop

Each week, we take turns selecting three featured posts from the Homestead Blog Hop. These features are shared across all of our social media platforms, helping spotlight the creativity and hard work of our fellow homesteaders. Here are the featured posts from last week’s hop:

1. Winter Homestead Baking: Lemon Muffins & Apple Buckle from The Once and Future Homestead

2. Easy and Delicious Brats in a Blanket from Organized Island

3. Egg Roll Bowl from Yummi Haus

Congrats! Feel free to grab the featured on button for your post.

Just right click and ‘save image as…‘

Guidelines for the Homestead Blog Hop

  1. Click the “Add Your Link” button below and upload a clear, eye-catching image from your project or recipe. Please link directly to the family-friendly post itself, not your blog’s homepage.
  2. You may link up up to three posts each week.
  3. Take time to visit a few other blogs in the hop and leave a thoughtful comment to let them know you stopped by. Community support makes this hop special!
  4. Please include a link back to the Homestead Blog Hop in your post. Posts without a backlink are not eligible to be featured. All featured posts are shared across all hosts’ social media channels.
  5. Share posts that haven’t been linked to the hop before. Older posts are welcome as long as they are new to the hop.
  6. By joining the Homestead Blog Hop, you grant the hosts permission to use one image from your post, with a link back to your site, if your post is selected as a feature next week.
  7. This is a family-friendly link-up designed to encourage, inspire, and support the homesteader in all of us.

Let the Party Begin!

Which project are you excited to try this week? Leave a comment below.

Join Our Homestead Blog Hop Pinterest Board

Follow all of your hosts on Pinterest and send a message if you’d like to be added to our Homestead Blog Hop group board. This board is a great place to share your DIY projects, crafts, and from-scratch recipes with the homesteading community.

Guideline: Only pin posts that you’ve linked up to the Homestead Blog Hop.

Tags: , , , , , ,
Best oLive
Privacy Overview

This website uses cookies so that we can provide you with the best user experience possible. Cookie information is stored in your browser and performs functions such as recognising you when you return to our website and helping our team to understand which sections of the website you find most interesting and useful.
