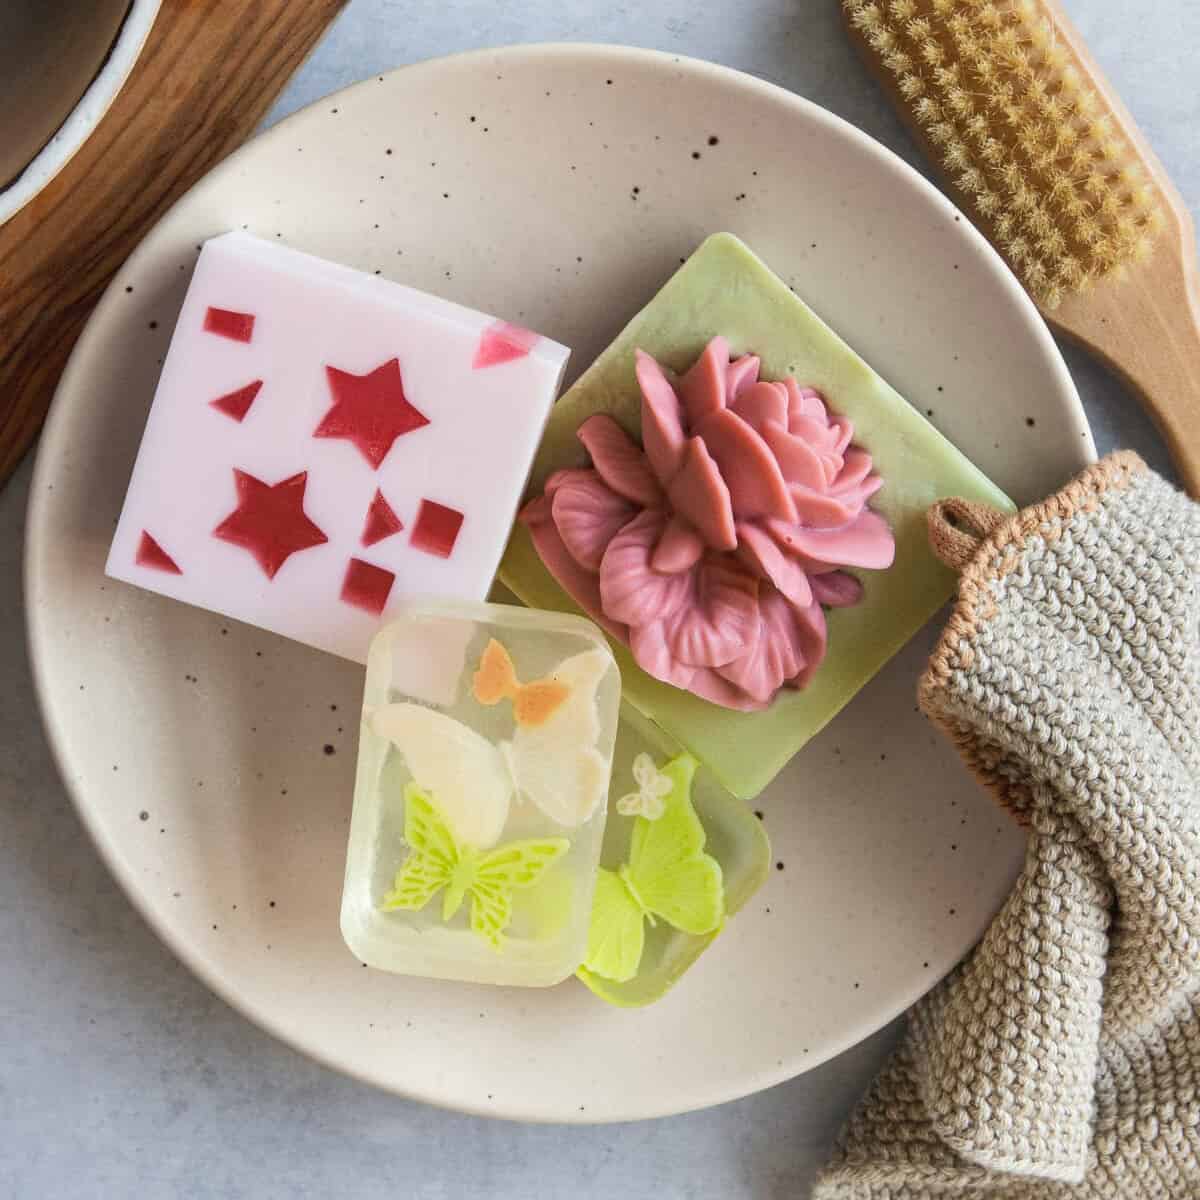
For the past several years, I’ve been diving into the world of soap making. While I love making it from scratch, I find that melt and pour soap making can be equally cathartic. Especially once I learned how to embed colorful shapes and create fun scenes without it taking days on end, like with cold process soap.
While embedding shapes in soap might seem simple (and it is!) there’s a bit of a learning curve that comes with the process. Little things you might not think about, like soap type, temperature or cooling time, can make or break your designs.
I learned that the hard way. But in this guide I’ll show you how to embed shapes in melt and pour soap like a pro, so you can get right to the fun part.
Which Melt and Pour Soap Base To Use?
Melt and pour soap base is a special kind of soap that’s meant to be cut into pieces and heated in the microwave. Once melted, you can then add scents, colors or other ingredients to tailor the soap to your own needs. You’ll then pour the melted soap into a custom mold and let it harden before cutting and storing it.
While melt and pour soap comes in a variety of types (glycerin, goat milk, oatmeal, etc.), there’s really only two types you need to be aware of when embedding shapes:
1. White soap base (goat milk, shea butter, oatmeal, etc.)
White soap base is opaque and somewhat soft. It usually contains oils or other ingredients that are good for skin, such as honey, oatmeal or shea butter. Because it’s soft (it has a lower melting point than glycerin soap), it’s often used as the out layer of soap, rather than for embedded shapes.
2. Clear soap base (glycerin)
Clear soap has a higher concentration of glycerin, a moisturizer derived from plant and animal fats. It’s not quite as soft as white soap, which means it gets hotter, cools more slowly, and holds its shape better.
Colors also appear more vibrant and pop more in clear soap base, making it ideal for embedded shapes. This isn’t a hard rule though, and once you’ve mastered the basics of melt and pour soap making, you can easily use either type of base for your shapes.
- Rubbing Alcohol in a Spray Bottle – Rubbing alcohol is used to help layers and shapes stick together in melt and pour soap. A quick spritz before pouring helps the new layer bond to the one below it. It also helps remove bubbles from the surface of freshly poured soap for a smoother finish.
- Thermometer – A thermometer helps you keep track of your soap’s temperature so it doesn’t melt your embedded shapes. It’s especially useful when layering, since the pour temperature affects how well the soaps bond. Keeping it within the right range makes for clean, defined designs.
- Large Knife for Cutting Shapes – A large knife helps you slice the soap base into manageable chunks before melting and cut larger pieces into simple shapes once it’s set. It gives you control over the size and thickness of each embedded piece.
- Small Knife or Potato Peeler for Cleaning Up Shapes – A small knife or potato peeler helps refine your shapes by smoothing edges or trimming away extra bits. It’s great for small adjustments that make your designs look a little more polished.
Ways to Make Shapes with Molds
Molds give your soap and embeds their shape. You can use traditional block molds for larger bars or smaller silicone molds for the embedded shapes themselves. Flexible molds make it easy to release the soap once it’s fully cooled.
When it comes to creating your shapes, there are 3 different ways to make them. The one you choose depends on your personal preference and/or how you’ll be embedding the shape.
1. Column Molds
This is the most common way to make embedded shapes. These flexible silicone molds have an interlocking seal the snaps together to form a long “column.”
You then pour your liquid soap base in the center, let it cool, and peel away the sides, leaving you with one long shape you’ll then embed into a rectangular mold.
2. Silicone Cake Decorating Molds
If you plan to make soap bars one at a time as opposed to in a large rectangular mold, you can use silicone cake decorating molds to make your shapes. The end result will be small shapes that you can embed on top of individual soap bars rather than inside the soap prior to cutting.
3. Non Soap Eembeds
You don’t have to make your own shapes to embed in soap. Try other ideas like these:
Molds for Pouring Soap
1. Rectangular Molds
Rectangular or block molds are large, loaf-style molds that hold several bars’ worth of soap in one pour. Once the soap hardens, you remove the whole block and cut it into individual bars with a knife. You’ll pair these molds with column molds or hand cut shapes to get the embedded-shape effect.
2. Single Bar Molds
Unlike rectangular molds, single bar molds have individual cavities that you fill separately. Once the soap cools, you can simply pop each bar out, no cutting required. You’ll often use these molds with shapes made from silicone cake decorating molds.
Preparing the Soap
Melt and pour soap is made to be heated in the microwave. While this is a rather quick and painless method, it often results in hot spots, clumps, bubbles or other issues.
Here’s how to prepare your soap so as to avoid these common pitfalls.
- Always cut your soap into 1” cubes before putting in the microwave.
- Heat it in 30-second intervals, stirring thoroughly between each round. This helps prevent hot spots and ensures uniform melting.
- Once melted, let the soap base cool to about 140°F before using. To cool it more quickly, put a thermometer in the melted soap and put it in the fridge. Check it every 5 minutes, peeling the hardened soap on the top to the side and gently stirring the melted soap to even out the temperature.
- Its important that you don’t mix the cooled crust that forms on top of the soap back into the melted soap. If you do that, it’ll make the soap chunky when you pour it into your molds.
- When it reaches 140°F, it’s ready to pour! If you miss the mark you can always put the soap back in the microwave and heat for another 5-10 seconds to liquify it again.
3 Techniques for Embedding Shapes
I rely on three main methods for embedding shapes. You can definitely get creative and come up with your own versions later, but mastering these three first will give you the skills to handle just about any soap design you dream up.
1. Using Column Shapes in a Rectangular Soap Mold
This method uses long, cylindrical shapes made with a column mold. Once your shapes have fully set, you place it inside a rectangular loaf mold and pour melt and pour soap around it. When the soap hardens, you’ll slice it into bars, revealing the embedded design running through the center of each one. It’s a simple and effective way to create a repeating pattern that looks striking from every angle.
We have a whole post explaining how to do this step-by-step with this pink peppermint soap.
2. Embedding Shapes in Single-Bar Molds
With this technique, you’ll use small silicone cake-decorating molds to make thin, flat-ish shapes. Once your shapes are ready, pour a thin layer of clear soap into each cavity of a single-bar mold, let it set slightly, then place your shape on top.
Finish by pouring more clear soap over it to encase the design in the middle. This layering method gives your soap a clean, professional look and works well for colorful or detailed designs.
Melt white soap base and add mica for color. Then pour into your silicone butterfly molds and let cool.
Melt clear soap base. Fill the cavity of a single-bar soap mold about halfway.
Spritz with alcohol and let cool for about 20 minutes.
Arrange 2-3 butterfly shapes in each mold cavity.
Make sure the temperature of your clear soap base is between 130°F and 140°F (if it’s too hot it will melt the butterfly shapes) before pouring your second layer. Spritz with alcohol.
Let cool completely before removing from the mold
3. Embedding 3D Shapes
If you want your shapes to stand out and look artsy, this is your method. You’ll create three-dimensional shapes using silicone molds, then embed them in single-bar molds so part of the shape extends beyond the soap’s surface.
The finished bar has a sculptural, playful look that makes it feel extra special. It’s a fun way to experiment with texture and depth while showing off your creativity.
Melt the white soap base and add a little red mica for color. Pour the melted soap into a silicone flower mold.
Spritz the top of the soap with rubbing alcohol to prevent any lumps or bubbles.
Allow it to cool for 1 hour before removing from the mold and cutting the soap in half.
Heat another batch of soap base in the microwave and add green mica for color. Fill the cavity of a single-bar soap mold until it’s ¾ full and spritz it with rubbing alcohol. Let cool for 10-15 minutes.
Check that the soap is 140°F or less. Then pour a thin, second layer of green soap on top of the cooled layer. Working quickly, embed the 3D shape on top.
Let cool completely before removing from the mold.
Tips for Successful Embedded Shapes
Control the temperature
When working with melt and pour soap, temperature is everything. If the soap is too hot when you pour it, it can cause your molds to warp, melt your embeds or create air bubbles. If it’s too cool, it may not fill out the mold properly.
Always use a thermometer to check the temperature before you pour. While a lot of tutorials recommend a temperature somewhere around 125°F, I’ve found that to be too cold. Instead I recommend pour the soap when it reaches about 140°F.
Don’t let the soap overheat
Always heat your soap base slowly, in short intervals if you’re using a microwave. Overheating can cause scorching, reduce clarity, or make the soap lose moisture and harden too quickly.
Keep your embeds in place
Let your first soap layer cool and form a sturdy skin before adding the next layer. This helps keep your embeds in place instead of floating or shifting.
If you find that your shapes are melting or bleeding when you add the layers, chill them in the refrigerator for a few minutes before embedding to prevent them from softening when the warm soap is poured around them.
Use rubbing alcohol generously
Keep a spray bottle of rubbing alcohol on hand and give everything a good spritz before and after pouring your layers. This makes a huge difference in the final look.
Rehydrate the soap before reheating
If you have to reheat the soap multiple times and it’s become too thick, add ½ teaspoon of water per pound of soap base each time you reheat it.
Troubleshooting Common Problems
Embeds sinking or melting
If your embeds keep sinking or shifting around, your soap base is probably too warm or too thin when you pour. Let the first layer cool until it forms a solid film on top (I usually touch it with my finger to make sure it’s nice and sturdy) before adding more embeds. That gives them something to rest on.
For lighter pieces, pour the next layer a little cooler so it thickens faster and holds everything in place.
If your embeds look a little melty, your soap is too hot. Try keeping it in the 130-140°F range to be safe.
Bubbles or cloudy layers
Two things can cause bubbles: either the air gets trapped or the soap is poured too hot. Always spray rubbing alcohol on the embeds before you pour to help the layers stick and keep bubbles from forming.
If your clear soap turns cloudy, it’s a sign it was overheated. Always microwave the soap slowly and stir well before each interval.
Cracks or separation between layers
Cracks or peeling is frustrating but easily avoidable. Cracks usually happen when the soap has cooled too much before adding the next layer. Try pouring the next layer while the bottom is still slightly warm but not soft. A light mist of rubbing alcohol before each pour can also help prevent this.
FAQ
How long does it take for melt and pour soap to set?
For large designs, it’s best to let it sit for at least 4 hours before cutting. If you’re in a hurry, you can pop it into the refrigerator for about 30 minutes, but avoid the freezer, which can cause condensation and sweating after you take it out.
How long to wait between layers of melt and pour soap?
I recommend waiting 15-20 minutes after pouring a layer to see if it’s sturdy enough for another. You want it to feel firm when you touch it, but not completely cold. If you wait too long you might get noticeable lines between layers, which can affect the look of your finished design.
Can I add things to melt and pour soap?
Some people say you shouldn’t add extra oils or ingredients to melt and pour soap because it might affect the texture once it cools. But I’ve found that, when used in moderation, additives don’t make a noticeable difference to the soap’s quality. Just don’t go overboard or your soap could get lumpy or greasy.
Print
]]>]]>
3 Ways to Embed Shapes in Melt and Pour Soap
Prep Time4 hours hrs
Total Time4 hours hrs
Course: Bath and Body Soap
Keyword: DIY, soap
Yield: 6 soaps
Author: Stephanie Pollard
Cost: $15
For 3D Shapes That Stick Out
For Shapes in Single-Bar Molds
Embedding 3D Shapes That Stick Out
-
Melt the white soap base and add a little red mica for color. Pour the melted soap into a silicone flower mold.
-
Spritz the top of the soap with rubbing alcohol to prevent any lumps or bubbles.
-
Allow it to cool for 1 hour before removing from the mold and cutting the soap in half.
-
Heat another batch of soap base in the microwave and add green mica for color. Fill the cavity of a single-bar soap mold until it’s ¾ full and spritz it with rubbing alcohol. Let cool for 10-15 minutes.
-
Check that the soap is 140°F or less. Then pour a thin, second layer of green soap on top of the cooled layer. Working quickly, embed the 3D shape on top.
-
Let cool completely before removing from the mold.
Embedding Shapes in Single-Bar Molds
-
Melt white soap base and add mica for color. Then pour into your silicone butterfly molds and let cool.
-
Melt clear soap base. Fill the cavity of a single-bar soap mold about halfway.
-
Spritz with alcohol and let cool for about 20 minutes.
-
Arrange 2-3 butterfly shapes in each mold cavity.
-
Make sure the temperature of your clear soap base is between 130°F and 140°F (if it’s too hot it will melt the butterfly shapes) before pouring your second layer. Spritz with alcohol.
-
Let cool completely before removing from the mold.
If your embeds look a little melty, your soap is too hot. Try keeping it in the 130-140°F range to be safe.
0