Homestead Blog Hop - Homestead tips, ideas, animal care, and recipes every Wednesday

Homestead Blog Hop 576 – Thanksgiving Meal Ideas

Welcome to the Homestead Blog Hop!

Homestead Blog Hop will take place every Wednesday and is for all things homesteading: real food recipes, farm animals, crafts, DIY, how-to’s, gardening, anything from-scratch, natural home/health, self-sufficiency, self-reliance, natural remedies, essential oils, & more! Basically, anything related to homesteading.

Meet Your Hosts!

Follow Their Blogs

Natasha – Houseful of Nicholes (Facebook | Pinterest | Twitter | Instagram)

Laurie – Ridge Haven Homestead (Facebook | Pinterest | Instagram)

Liz – The Cape Coop (Facebook | Pinterest | Twitter | Instagram)

Kelly – Simple Life Mom (Facebook | Pinterest | Instagram)

FEATURED POSTS from the Last Homestead Blog Hop

Each week we take turns choosing three posts to feature. Each post will be shared on all social media platforms by all of the hosts! Here are the features from Last Week’s Hop:

1.Air Fryer Twice Baked Sweet Potatoes – from Air Fryer Fanatics

2. Printable Thanksgiving Pictionary – from Darcy and Brian

3. Crayon Bulletin Board Set Free Printables from Homemade on a Weeknight

Congrats! Feel free to grab the featured on button for your post.

Just right click and ‘save image as…‘

Guidelines for this Get-Together:

  1. Click on the “Add your Link” Button below and add a great image of your project or recipe. Make sure you link to the page of your family friendly post – not the main page of your blog.
  2. Link up to three posts each week.
  3. Try to visit at least a few other blogs at the party. Be sure to leave a comment to let them know you stopped by.
  4. Link your post back to the Homestead Blog Hop. If the hop isn’t linked to your post then you cannot be featured. All featured posts will be shared on all hosts’ social media channels.
  5. Please link up posts that you haven’t linked to the hop before. You are welcome to link old posts from your blog.
  6. By joining the party, you are giving the hosts permission to use one photo from your post with a link back to your site if it is selected as one of next week’s Features.
  7. This is a family-friendly link up meant to inspire and motivate the homesteader in all of us.

Let the Party Begin!

Join Our Pinterest Board

Follow all your hosts on Pinterest and send me a message that you’d like to be added to our Homestead Blog Hop group board. The only rule is to only add posts that you’ve also added here.

Tags: , , , , ,
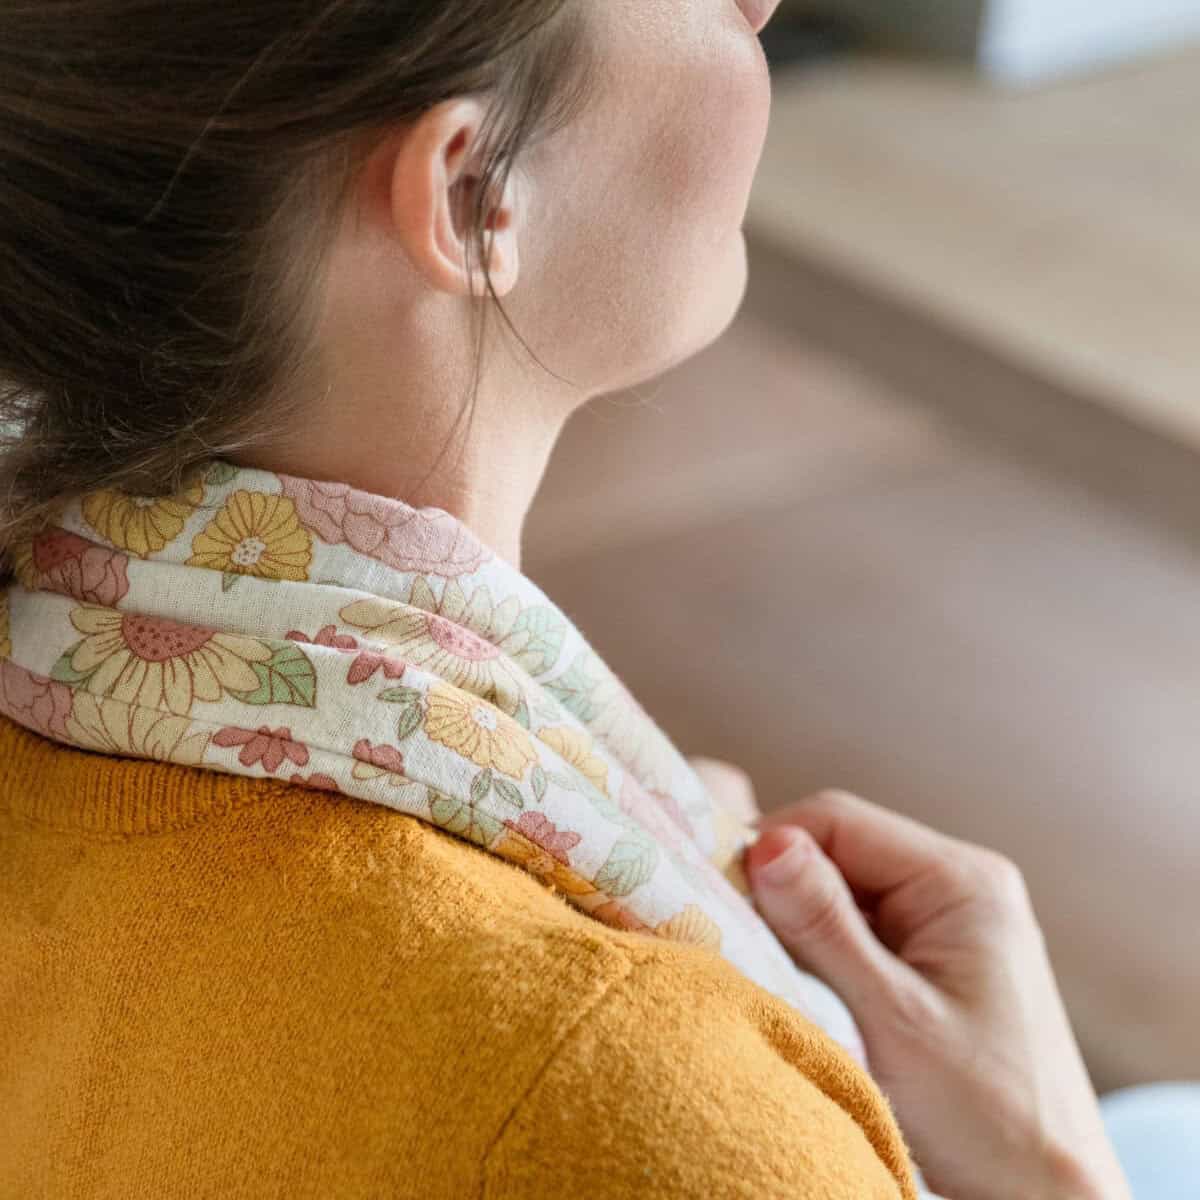
How To Make a Heated Herbal Neck Wrap

How To Make a Heated Herbal Neck Wrap

This happy little heat therapy pack nestles into all the tense nooks and crannies around your neck, soothing away tension and softening the painful spots that pop up as we age.

I don’t know when it happened, but at some point my body decided that all it wants is to be warm and comfortable. I work from home most days, so when I’m feeling cranky and just over it, I’ll change into comfy clothes around 4 PM, put on my slippers and grab this warming herbal neck wrap.

A quick spin in the microwave is all it takes to warm the flaxseed inside and activate the lavender blossoms for a little aromatherapy. Then I’ll drape it over my neck and melt into the sofa like it’s a waterbed.

While it does require a sewing machine (you don’t want glue melting in the microwave), as long as you can sew in a straight line it’ll be a piece of cake.

Herbal Neck Wrap Supplies

Making your own warming neck wrap is simple and surprisingly quick. You can finish it in about an hour, and the result feels just as cozy and effective as anything you’d buy in a store.

If you have the time and supplies, you can always make a second one that you can keep in the freezer for some cold therapy. Or scale it down and make one the perfect size for a weighted eye mask.

Since it goes in the microwave, just make sure you’re not using anything that could potentially melt or catch on fire.

  • 100% Cotton Fabric – You can use any organic cotton you like, but I prefer to use cotton flannel baby blankets. They’re soft and comfortable. They’re also organic and free of any weird chemicals or coatings that might get gross when heated. Organic linen or hemp would also work here as well. 
  • 100% Cotton Thread – Avoid any metallic thread, which might spark in the microwave, or synthetic thread, which may melt if overheated.
  • Twill Tape – While not totally necessary, I think having handles on my neck wrap is a cheap upgrade. Pulling on them increases the pressure and heat on your tired muscles. They can also be tied, helping to keep the wrap in place. But if you find the added steps overwhelming, you can leave them off without affecting the wrap.

Fill it will flaxseed (or rice, in a pinch) and some dried flower blossoms for scent. Lavender is a great choice, but you can also go with chamomile, rose or jasmine depending on your preferences.

  • Organic Flax Seed – I’ve seen both white rice and flaxseed used in warming wraps, but I recommend sticking with flax. The oils in the flaxseed heat up slowly and retain heat longer than rice, so your wrap won’t need to be reheated as often. It’s also less likely to retain moisture and get moldy, which is an added bonus. 
  • Organic Dried Lavender Blossoms – I’m partial to lavender because I find it especially relaxing, but you can use any dried flowers you like. Chamomile, rose, jasmine, gardenia or lilac could all work. You could also use soothing herbs, like peppermint, rosemary, or thyme, if that’s more your speed.

See the recipe card below for quantities.

Instructions

With the right sides together, fold the fabric in half lengthwise (hot dog style) so that the long edges line up.

Using a ½” seam allowance, sew the long seam. Then turn right side out and press.

On one of the short ends, fold the raw edge of the fabric in by ½ inch and press.

Insert the ends of your twill tape and pin in place.

Sew the end closed with the twill tape in place using a top stitch. Remove the pins.

Starting at the closed end, measure 1.5″ down from the top edge. Draw a horizontal line.

Come down to the line you just drew. Measure 1.5″ in from the left edge and draw a line lengthwise down the neck wrap, ending 2″ from the bottom (this includes your ½” inseam).

Move another 1.5″ to the right and draw a second line lengthwise down the wrap.

You should end up with 2 equidistant vertical lines starting 1.5 inches from the top edge, and 1.5 inches in from each side. The lines should stop 2 inches from the bottom edge.

Sew along each vertical line.

Your lines should look like this. This gives the wrap structure that helps keep the flaxseed in place and prevents it from settling on either end of the wrap.

Mix the lavender and flaxseed together in a small bowl. Pour ½ cup into the open end then shake to get it to the bottom.

Keep going until the wrap is almost, but not quite, full. There needs to be some flexibility so it can wrap around your neck.

Fold the raw ends of the open side under and press and insert the ends of your twill tape on the outer edges

Top stitch the end closed. And your neck wrap is ready to use!

How To Use Your Neck Wrap

Place the wrap in the microwave and heat in 30-second intervals until desired warmth is achieved. Be careful not to microwave for more than 90 seconds, otherwise you risk it drying out and starting on fire.

Test the temperature of your pack (make sure it’s not too hot!) then drape it around your neck and shoulders to relax tight muscles, ease tension, or warm up on a chilly day. You can also place it on your lower back or across your abdomen for gentle comfort.

The heat usually lasts around 20 to 30 minutes. When it cools down, just pop it back in the microwave for another minute to get it back to the desired temperature.

Top Tip: If you use white rice instead of flaxseed, place a small cup of water in the microwave with your wrap when you heat it. Rice has less oil the flaxseed and tends to dry out more in the microwave, which may cause a fire if you’re not careful. 

FAQ

What fabric works best for a DIY neck wrap?

Any organic, natural fiber fabric will work. Cotton or flannel are great choices because they’re soft, breathable, and safe to heat in the microwave. Always avoid synthetic fabrics, which can melt, off gas chemicals or give off odors.

Can I use essential oils instead of dried flowers?

Yes, absolutely. Mixing a few drops of essential oil with the flaxseed will give you the same aromatherapy benefits as dried flowers.

Can I use it as this heated neck wrap as a cold pack too?

Sure, just place it in a sealed bag and store pop it in the freezer for a few hours. It’s great for headaches, sore muscles or tired eyes.

How long does a DIY neck wrap last?

With regular use, it can last several years. If it starts to smell off or the fabric wears thin, it’s time to make a new one.

Print

]]>]]>

DIY Herbal Neck Wrap

This happy little heat therapy pack nestles into all the tense nooks and crannies of your neck, soothing away tension and softening the painful spots that pop up as we age.

Prep Time1 hour

Total Time1 hour

Course: Aromatherapy

Keyword: DIY

Yield: 1 neck wrap

Author: Stephanie Pollard

Cost: $15

Equipment

  • Wide neck funnel

  • Iron

  • Sewing machine

  • Ruler

  • Sewing chalk

Instructions

  • With the right sides together, fold your cotton fabric in half so that the long edges line up

  • Sew this long seam. Then turn the fabric right side out and press.

  • Take one of the short ends. Tuck the raw edge under by about ½” and press.

  • Insert the ends of your twill tape and pin in place. Sew the edge closed using a top stitch.

  • Starting at the closed end, measure 1.5″ down from the top edge. Draw a horizontal line.

  • Come down to the line you just drew. Measure 1.5″ in from the left edge and draw a line lengthwise down the neck wrap, ending 2″ from the bottom (this includes your ½” inseam)Move another 1.5″ to the right and draw a second line lengthwise down the wrap.You should end up with 2 equidistant vertical lines starting 1.5″ from the top edge, and 1.5″ in from each side. The lines should stop 2″ from the bottom edge.
  • Then sew along the vertical lines.

  • Mix the lavender and flaxseed in a bowl. Fill your neck wrap with the flaxseed mixture. Leave room at the top so there’s some flexibility to the neck wrap.

  • Fold the raw ends of one side under and press. Just like you did for the other end, insert the ends of your twill tape on the outer edges of this short end. Topstitch closed.

Notes

I simply poured the mixture into the wrap as best I could, trying to get the seed evenly spread between each of the three columns. But you might find that a wide neck funnel makes it easier to fill.
If you use white rice instead of flaxseed, place a small cup of water in the microwave with your wrap when you heat it. Rice has less oil the flaxseed and tends to dry out more in the microwave, which may cause a fire if you’re not careful. 
0

Tags: , , ,
How To Embed Shapes in Melt + Pour Soap

How To Embed Shapes in Melt + Pour Soap

For the past several years, I’ve been diving into the world of soap making. While I love making it from scratch, I find that melt and pour soap making can be equally cathartic. Especially once I learned how to embed colorful shapes and create fun scenes without it taking days on end, like with cold process soap.

While embedding shapes in soap might seem simple (and it is!) there’s a bit of a learning curve that comes with the process. Little things you might not think about, like soap type, temperature or cooling time, can make or break your designs.

I learned that the hard way. But in this guide I’ll show you how to embed shapes in melt and pour soap like a pro, so you can get right to the fun part.

Which Melt and Pour Soap Base To Use?

Melt and pour soap base is a special kind of soap that’s meant to be cut into pieces and heated in the microwave. Once melted, you can then add scents, colors or other ingredients to tailor the soap to your own needs. You’ll then pour the melted soap into a custom mold and let it harden before cutting and storing it.

While melt and pour soap comes in a variety of types (glycerin, goat milk, oatmeal, etc.), there’s really only two types you need to be aware of when embedding shapes:

1. White soap base (goat milk, shea butter, oatmeal, etc.)

White soap base is opaque and somewhat soft. It usually contains oils or other ingredients that are good for skin, such as honey, oatmeal or shea butter. Because it’s soft (it has a lower melting point than glycerin soap), it’s often used as the out layer of soap, rather than for embedded shapes.

2. Clear soap base (glycerin)

Clear soap has a higher concentration of glycerin, a moisturizer derived from plant and animal fats. It’s not quite as soft as white soap, which means it gets hotter, cools more slowly, and holds its shape better.

Colors also appear more vibrant and pop more in clear soap base, making it ideal for embedded shapes. This isn’t a hard rule though, and once you’ve mastered the basics of melt and pour soap making, you can easily use either type of base for your shapes.

  • Rubbing Alcohol in a Spray Bottle – Rubbing alcohol is used to help layers and shapes stick together in melt and pour soap. A quick spritz before pouring helps the new layer bond to the one below it. It also helps remove bubbles from the surface of freshly poured soap for a smoother finish.
  • Thermometer – A thermometer helps you keep track of your soap’s temperature so it doesn’t melt your embedded shapes. It’s especially useful when layering, since the pour temperature affects how well the soaps bond. Keeping it within the right range makes for clean, defined designs.
  • Large Knife for Cutting Shapes – A large knife helps you slice the soap base into manageable chunks before melting and cut larger pieces into simple shapes once it’s set. It gives you control over the size and thickness of each embedded piece.
  • Small Knife or Potato Peeler for Cleaning Up Shapes – A small knife or potato peeler helps refine your shapes by smoothing edges or trimming away extra bits. It’s great for small adjustments that make your designs look a little more polished.

Ways to Make Shapes with Molds

Molds give your soap and embeds their shape. You can use traditional block molds for larger bars or smaller silicone molds for the embedded shapes themselves. Flexible molds make it easy to release the soap once it’s fully cooled.

When it comes to creating your shapes, there are 3 different ways to make them. The one you choose depends on your personal preference and/or how you’ll be embedding the shape.

1. Column Molds

This is the most common way to make embedded shapes. These flexible silicone molds have an interlocking seal the snaps together to form a long “column.”

You then pour your liquid soap base in the center, let it cool, and peel away the sides, leaving you with one long shape you’ll then embed into a rectangular mold.

2. Silicone Cake Decorating Molds

If you plan to make soap bars one at a time as opposed to in a large rectangular mold, you can use silicone cake decorating molds to make your shapes. The end result will be small shapes that you can embed on top of individual soap bars rather than inside the soap prior to cutting.

3. Non Soap Eembeds

You don’t have to make your own shapes to embed in soap. Try other ideas like these:

Molds for Pouring Soap

1. Rectangular Molds

Rectangular or block molds are large, loaf-style molds that hold several bars’ worth of soap in one pour. Once the soap hardens, you remove the whole block and cut it into individual bars with a knife. You’ll pair these molds with column molds or hand cut shapes to get the embedded-shape effect.

2. Single Bar Molds

Unlike rectangular molds, single bar molds have individual cavities that you fill separately. Once the soap cools, you can simply pop each bar out, no cutting required. You’ll often use these molds with shapes made from silicone cake decorating molds.

Preparing the Soap

Melt and pour soap is made to be heated in the microwave. While this is a rather quick and painless method, it often results in hot spots, clumps, bubbles or other issues.

Here’s how to prepare your soap so as to avoid these common pitfalls.

  • Always cut your soap into 1” cubes before putting in the microwave.
  • Heat it in 30-second intervals, stirring thoroughly between each round. This helps prevent hot spots and ensures uniform melting.
  • Once melted, let the soap base cool to about 140°F before using. To cool it more quickly, put a thermometer in the melted soap and put it in the fridge. Check it every 5 minutes, peeling the hardened soap on the top to the side and gently stirring the melted soap to even out the temperature.
  • Its important that you don’t mix the cooled crust that forms on top of the soap back into the melted soap. If you do that, it’ll make the soap chunky when you pour it into your molds.
  • When it reaches 140°F, it’s ready to pour! If you miss the mark you can always put the soap back in the microwave and heat for another 5-10 seconds to liquify it again.

3 Techniques for Embedding Shapes

I rely on three main methods for embedding shapes. You can definitely get creative and come up with your own versions later, but mastering these three first will give you the skills to handle just about any soap design you dream up.

1. Using Column Shapes in a Rectangular Soap Mold

This method uses long, cylindrical shapes made with a column mold. Once your shapes have fully set, you place it inside a rectangular loaf mold and pour melt and pour soap around it. When the soap hardens, you’ll slice it into bars, revealing the embedded design running through the center of each one. It’s a simple and effective way to create a repeating pattern that looks striking from every angle.

We have a whole post explaining how to do this step-by-step with this pink peppermint soap.

2. Embedding Shapes in Single-Bar Molds

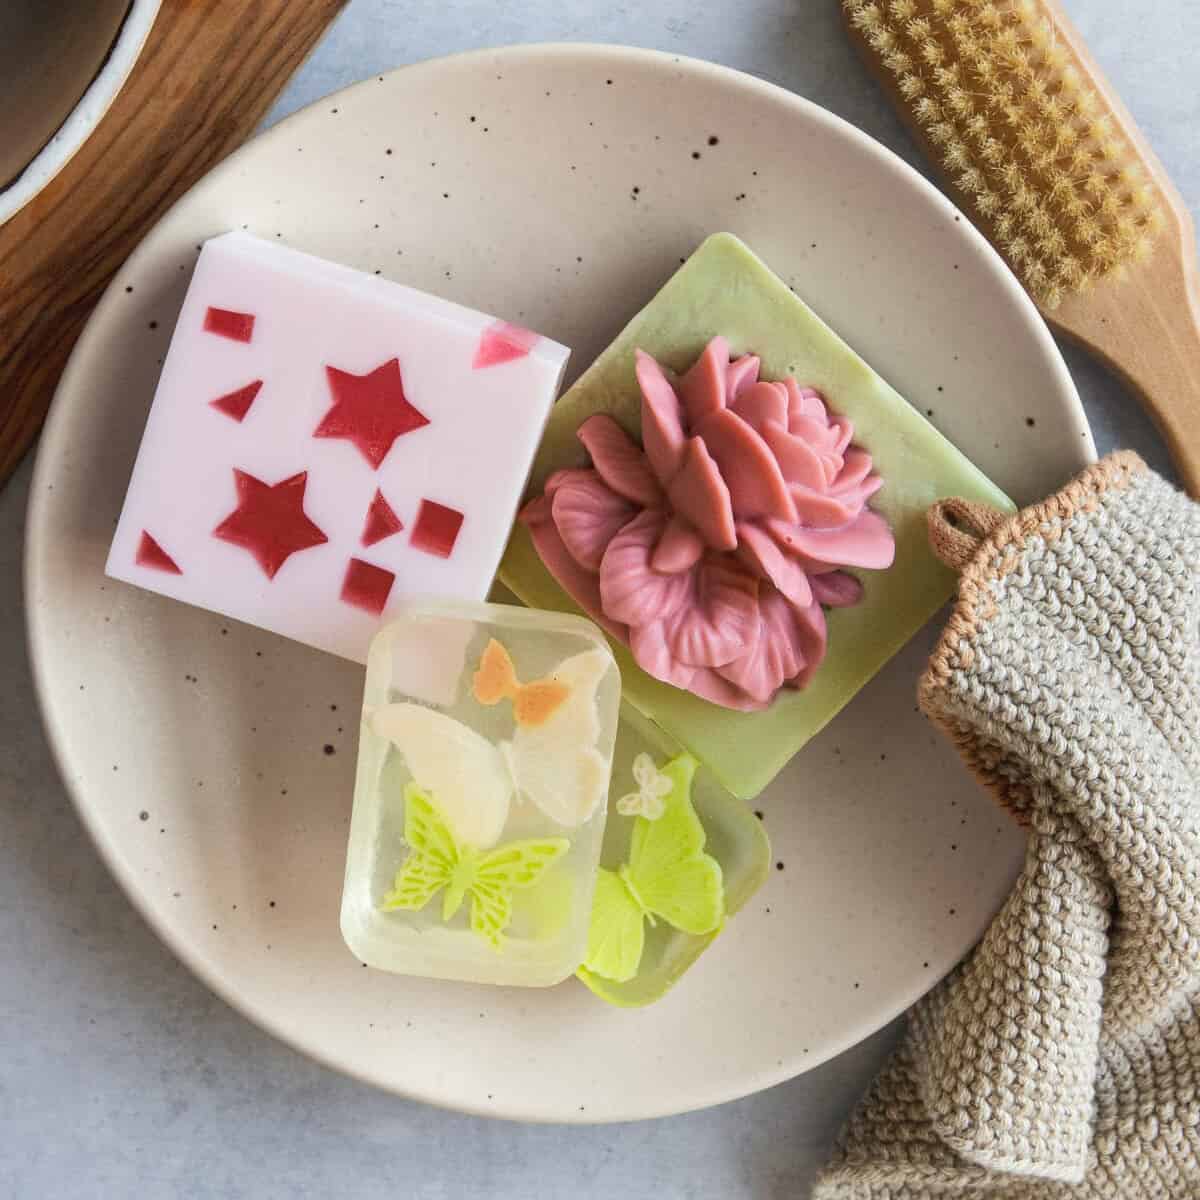
With this technique, you’ll use small silicone cake-decorating molds to make thin, flat-ish shapes. Once your shapes are ready, pour a thin layer of clear soap into each cavity of a single-bar mold, let it set slightly, then place your shape on top.

Finish by pouring more clear soap over it to encase the design in the middle. This layering method gives your soap a clean, professional look and works well for colorful or detailed designs.

Melt white soap base and add mica for color. Then pour into your silicone butterfly molds and let cool.

Melt clear soap base. Fill the cavity of a single-bar soap mold about halfway.

Spritz with alcohol and let cool for about 20 minutes.

Arrange 2-3 butterfly shapes in each mold cavity.

Make sure the temperature of your clear soap base is between 130°F and 140°F (if it’s too hot it will melt the butterfly shapes) before pouring your second layer. Spritz with alcohol.

Let cool completely before removing from the mold

3. Embedding 3D Shapes

If you want your shapes to stand out and look artsy, this is your method. You’ll create three-dimensional shapes using silicone molds, then embed them in single-bar molds so part of the shape extends beyond the soap’s surface.

The finished bar has a sculptural, playful look that makes it feel extra special. It’s a fun way to experiment with texture and depth while showing off your creativity.

Melt the white soap base and add a little red mica for color. Pour the melted soap into a silicone flower mold.

Spritz the top of the soap with rubbing alcohol to prevent any lumps or bubbles.

Allow it to cool for 1 hour before removing from the mold and cutting the soap in half.

Heat another batch of soap base in the microwave and add green mica for color. Fill the cavity of a single-bar soap mold until it’s ¾ full and spritz it with rubbing alcohol. Let cool for 10-15 minutes.

Check that the soap is 140°F or less. Then pour a thin, second layer of green soap on top of the cooled layer. Working quickly, embed the 3D shape on top.

Let cool completely before removing from the mold.

Tips for Successful Embedded Shapes

Control the temperature

When working with melt and pour soap, temperature is everything. If the soap is too hot when you pour it, it can cause your molds to warp, melt your embeds or create air bubbles. If it’s too cool, it may not fill out the mold properly.

Always use a thermometer to check the temperature before you pour. While a lot of tutorials recommend a temperature somewhere around 125°F, I’ve found that to be too cold. Instead I recommend pour the soap when it reaches about 140°F.

Don’t let the soap overheat

Always heat your soap base slowly, in short intervals if you’re using a microwave. Overheating can cause scorching, reduce clarity, or make the soap lose moisture and harden too quickly.

Keep your embeds in place

Let your first soap layer cool and form a sturdy skin before adding the next layer. This helps keep your embeds in place instead of floating or shifting.

If you find that your shapes are melting or bleeding when you add the layers, chill them in the refrigerator for a few minutes before embedding to prevent them from softening when the warm soap is poured around them.

Use rubbing alcohol generously

Keep a spray bottle of rubbing alcohol on hand and give everything a good spritz before and after pouring your layers. This makes a huge difference in the final look.

Rehydrate the soap before reheating

If you have to reheat the soap multiple times and it’s become too thick, add ½ teaspoon of water per pound of soap base each time you reheat it.

Troubleshooting Common Problems

Embeds sinking or melting

If your embeds keep sinking or shifting around, your soap base is probably too warm or too thin when you pour. Let the first layer cool until it forms a solid film on top (I usually touch it with my finger to make sure it’s nice and sturdy) before adding more embeds. That gives them something to rest on.

For lighter pieces, pour the next layer a little cooler so it thickens faster and holds everything in place.

If your embeds look a little melty, your soap is too hot. Try keeping it in the 130-140°F range to be safe.

Bubbles or cloudy layers

Two things can cause bubbles: either the air gets trapped or the soap is poured too hot. Always spray rubbing alcohol on the embeds before you pour to help the layers stick and keep bubbles from forming.

If your clear soap turns cloudy, it’s a sign it was overheated. Always microwave the soap slowly and stir well before each interval.

Cracks or separation between layers

Cracks or peeling is frustrating but easily avoidable. Cracks usually happen when the soap has cooled too much before adding the next layer. Try pouring the next layer while the bottom is still slightly warm but not soft. A light mist of rubbing alcohol before each pour can also help prevent this.

FAQ

How long does it take for melt and pour soap to set?

For large designs, it’s best to let it sit for at least 4 hours before cutting. If you’re in a hurry, you can pop it into the refrigerator for about 30 minutes, but avoid the freezer, which can cause condensation and sweating after you take it out.

How long to wait between layers of melt and pour soap?

I recommend waiting 15-20 minutes after pouring a layer to see if it’s sturdy enough for another. You want it to feel firm when you touch it, but not completely cold. If you wait too long you might get noticeable lines between layers, which can affect the look of your finished design. 

Can I add things to melt and pour soap?

Some people say you shouldn’t add extra oils or ingredients to melt and pour soap because it might affect the texture once it cools. But I’ve found that, when used in moderation, additives don’t make a noticeable difference to the soap’s quality. Just don’t go overboard or your soap could get lumpy or greasy.

Print

]]>]]>

3 Ways to Embed Shapes in Melt and Pour Soap

Prep Time4 hours

Total Time4 hours

Course: Bath and Body Soap

Keyword: DIY, soap

Yield: 6 soaps

Author: Stephanie Pollard

Cost: $15

Materials

For 3D Shapes That Stick Out

For Shapes in Single-Bar Molds

Instructions

Embedding 3D Shapes That Stick Out

  • Melt the white soap base and add a little red mica for color. Pour the melted soap into a silicone flower mold.

  • Spritz the top of the soap with rubbing alcohol to prevent any lumps or bubbles.

  • Allow it to cool for 1 hour before removing from the mold and cutting the soap in half.

  • Heat another batch of soap base in the microwave and add green mica for color. Fill the cavity of a single-bar soap mold until it’s ¾ full and spritz it with rubbing alcohol. Let cool for 10-15 minutes.

  • Check that the soap is 140°F or less. Then pour a thin, second layer of green soap on top of the cooled layer. Working quickly, embed the 3D shape on top.

  • Let cool completely before removing from the mold.

Embedding Shapes in Single-Bar Molds

  • Melt white soap base and add mica for color. Then pour into your silicone butterfly molds and let cool.

  • Melt clear soap base. Fill the cavity of a single-bar soap mold about halfway.

  • Spritz with alcohol and let cool for about 20 minutes.

  • Arrange 2-3 butterfly shapes in each mold cavity.

  • Make sure the temperature of your clear soap base is between 130°F and 140°F (if it’s too hot it will melt the butterfly shapes) before pouring your second layer. Spritz with alcohol.

  • Let cool completely before removing from the mold.

Notes

If your embeds look a little melty, your soap is too hot. Try keeping it in the 130-140°F range to be safe.

0

Tags: , , , ,
Homestead Blog Hop - Homestead tips, ideas, animal care, and recipes every Wednesday

Homestead Blog Hop 574 – Make Snickerdoodles and Crafts

Welcome to the Homestead Blog Hop!

Homestead Blog Hop will take place every Wednesday and is for all things homesteading: real food recipes, farm animals, crafts, DIY, how-to’s, gardening, anything from-scratch, natural home/health, self-sufficiency, self-reliance, natural remedies, essential oils, & more! Basically, anything related to homesteading.

Meet Your Hosts!

Follow Their Blogs

Natasha – Houseful of Nicholes (Facebook | Pinterest | Twitter | Instagram)

Laurie – Ridge Haven Homestead (Facebook | Pinterest | Instagram)

Liz – The Cape Coop (Facebook | Pinterest | Twitter | Instagram)

Kelly – Simple Life Mom (Facebook | Pinterest | Instagram)

FEATURED POSTS from the Last Homestead Blog Hop

Each week we take turns choosing three posts to feature. Each post will be shared on all social media platforms by all of the hosts! Here are the features from Last Week’s Hop:

1. Craft Stick Thankful Bucket Turkey from Creatively Beth

2. Easy Cranberry Apple Crisp with Buttery Oat Topping from Pinecones and Acorns

3. Pumpkin Snickerdoodles from Yummi Haus

Congrats! Feel free to grab the featured on button for your post.

Just right click and ‘save image as…‘

Guidelines for this Get-Together:

  1. Click on the “Add your Link” Button below and add a great image of your project or recipe. Make sure you link to the page of your family friendly post – not the main page of your blog.
  2. Link up to three posts each week.
  3. Try to visit at least a few other blogs at the party. Be sure to leave a comment to let them know you stopped by.
  4. Link your post back to the Homestead Blog Hop. If the hop isn’t linked to your post then you cannot be featured. All featured posts will be shared on all hosts’ social media channels.
  5. Please link up posts that you haven’t linked to the hop before. You are welcome to link old posts from your blog.
  6. By joining the party, you are giving the hosts permission to use one photo from your post with a link back to your site if it is selected as one of next week’s Features.
  7. This is a family-friendly link up meant to inspire and motivate the homesteader in all of us.

Let the Party Begin!

Join Our Pinterest Board

Follow all your hosts on Pinterest and send me a message that you’d like to be added to our Homestead Blog Hop group board. The only rule is to only add posts that you’ve also added here.

Tags: , , , ,
Easy & Classy DIY Hostess Gifts That Wow!

Easy & Classy DIY Hostess Gifts That Wow!

Sharing is caring!

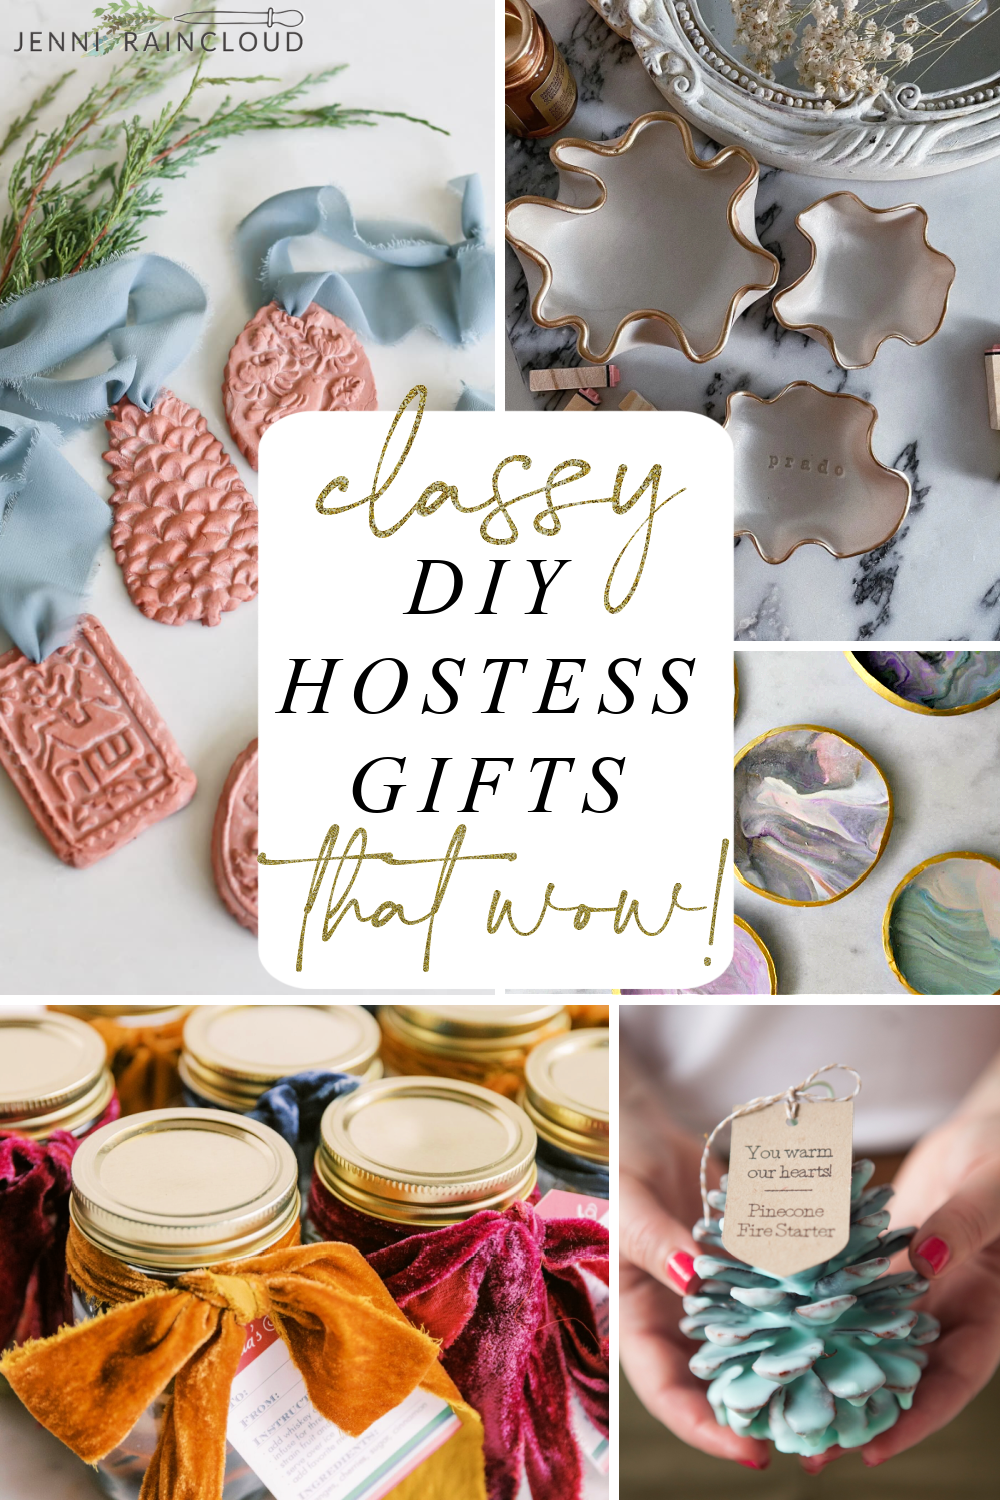
It’s the season of get togethers and holiday parties and I have been noticing so many amazing DIY hostess gift ideas on Pinterest. Plus I have a few on this blog that are tried and true. I thought I’d round up the best, most classy DIY hostess gifts that are affordable and easy to make and so much more special than grabbing a bottle of wine on the way! 

Making your own gifts is such a lovely way to show your friends and family that you care. In the days of consumerism where everyone seems to have everything they need and all that they want, I think as a society we are longing for connection and realness. An intentional, down to earth item that was made with thought and love is the perfect way to celebrate this holiday season! 

Many of these DIY gifts can be made in bulk easily and affordably. Add a beautiful gift tag and pretty bow and you’ve definitely brought the holiday cheer any hostess would welcome! 

More Holiday Gift Ideas:

Hot Cocoa Mix:

I posted my hot cocoa mix recipe last winter and it’s been an absolute hit. I made a HUGE amount and it’s now time to make a fresh batch for my home. It’s easy, affordable and cuts back on some nasty ingredients you’d find in many hot cocoa packets. My family has been using it all throughout the year and agreed it tastes better than store bought. While I didn’t post this as a gift idea, it’s a great gift idea! It can be made and sorted into 4 ounce glass jars. Add a little bottle of Bailey’s and marshmallows for an extra treat! Add a label and ribbon and you’ve got such a cute hostess gift! 

Find the recipe HERE. 

DIY Terrariums:

I love making terrariums and indoor succulent gardens. Even though it’s not summer, you can find succulents or terrarium friendly plants at a plant nursery. You can get creative and add your choice of rock and glass vessels are super chic yet affordable. I find mine at Hobby Lobby. 

Go HERE for more direction and ideas. 

Marbled Clay Trinket Dishes:

Making marbled clay dishes is one of my favorite DIYs. It’s so easy yet looks so high end! You can customize colors, choose to add a shiny top coat and even add a metallic rim if you choose! I chose clay that needs to be baked but you could also work with air dry clay. 

For the full tutorial, go HERE. 

Wavy Trinket Dishes w/ Stamped Last Name

Laura Jade Prado

These trinket dishes are so gorgeous and I love the idea of stamping someone’s name into the dish. Amazon has very affordable stamp kits. These dishes would be easy to make with the irregular waviness of the dishes. I love the gold edge as well! 

Go HERE for full tutorial. 

Firestarter Pinecones:

Something Turqouise

If you’re like me and live near pine trees, pinecones are everywhere and I’m always looking for fun DIYs to use them. This is an easy and unique way to give a cute gift. This tutorial comes with a downloadable label as well! Plus, you can use the remnants of old candles or buy soy on Amazon. You just need wicks! 

Get full fire starter pinecone tutorial HERE. 

DIY Simmer Pot Jars

Twelve On Main

I love to simmer cinnamon, cranberries, oranges, rosemary and lemons on the stove in the colder months. It’s a great way to create a cozy atmosphere and it smells amazing! It’s such a clever idea to add these items to a jar and give as a hostess gift! By dehydrating the citrus fruits in the oven, this makes a fantastic gift that the host can use whenever they are ready! 

For the full tutorial go HERE. 

DIY Cocktail Infusion Kits:

Pretty Together

Did you know you can infuse liquors like bourbon, whiskey, rum and vodka? Infused cocktails take your bartending prowess up about 20 notches! Adding items like dehydrated citrus, sugar, cinnamon or herbs to a jar for your host to add a specific liquor is such a great idea! This blog post even comes with printable tags making it so easy to throw these cocktail infusion kits together and give to all your friends this holiday season!

For instructions go HERE. 

DIY Terracotta Ornaments:

Tidbits & Company

These terracotta ornaments are just stunning. They stopped me dead in my tracks on Pinterest! Turns out they are made from molds (from Amazon) with a dusting of flour to create the look. Adding a beautiful bow makes them even prettier. What a special gift to give this holiday season! Plus, did you know you can use terracotta to diffuse essential oils? Just drop a few drops into the ornament and hang anywhere you’d like a special scent! 

For how to make terracotta ornaments, go HERE. 

Rosemary Infused Salt:

Boxwood Avenue

Rosemary infused salt is such an easy DIY but also an incredibly thoughtful gift that could easily be found in higher end stores like William Sonoma, Anthropologie or West Elm. Add a simple tag and you’ve got a creative and useful gift to give your host!! 

For the recipe go HERE. 

There you have it-the best hostess gifts for this holiday season all in one post! I hope you found some great options! Which is your favorite? Mine are the infused cocktail kits but I also love the hot cocoa mix as well! 

xx, Jenni

Sharing is caring!

Tags: , , , , ,
Sweet_Potato_Shepherds pie

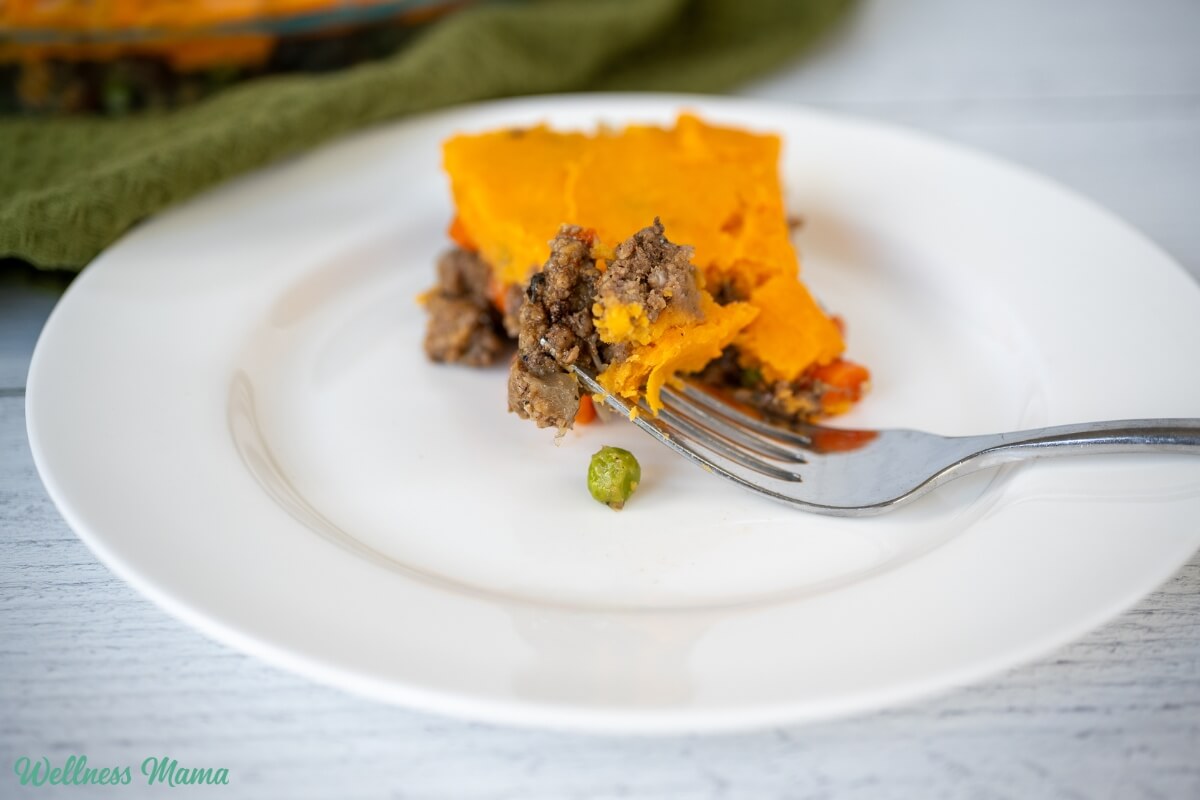
Sweet Potato Shepherd’s Pie Recipe (Family Favorite!)

One of our favorite cold-weather meals is classic shepherd’s pie. In this not-so-classic version, you get a big veggie boost from mashed sweet potato. It’s a delicious spin on traditional shepherd’s pie, especially if you’re making the switch from white potatoes (or if you just prefer the taste!).

Sweet Potato Shepherd’s Pie Recipe

You might be wondering if you can use sweet potatoes to make shepherd’s pie. While white potatoes are key in the traditional Irish dish, no one says you can’t use sweet potatoes! And really, our family prefers the taste. White potatoes or sweet potatoes aren’t any better, it’s really just about preference.

If you’re doing Whole 30, which doesn’t allow dairy (and favors sweet potatoes), then this version is easily adaptable. Not only is it healthy and easy, but it’s also paleo, gluten-free, and can easily be made dairy-free.

How to Make Sweet Potato Shepherd’s Pie

I’ve left the recipe for my shepherd’s pie pretty similar to most, but added kale for a little extra vegetable boost and swapped out the traditional with potatoes for sweet potatoes. This recipe is similar to my meatloaf cupcakes, but with more veggies.

To make the casserole, I brown the ground beef with seasonings, then stir in the diced vegetables, heat it up, and pour it into a casserole dish. I have this oven safe deep skillet that I use for both purposes and save myself a pan to wash.

While the meat is cooking I mash the sweet potatoes with butter and salt and smooth them on top of the meat and vegetable mixture when it is done. To save myself a little time, I usually make extra sweet potatoes with another meal earlier in the week then just pull them out of the fridge when I’m ready to use them.

Shepherd’s Pie Ingredients and Substitutions 

While I like the kale for extra nutrition, you can also leave it out if you just prefer to have mixed veggies. Or use another leafy green like spinach or chard instead. If you want to add even more flavor, add a splash of coconut aminos, Worcestershire sauce, or balsamic vinegar for extra depth.

Want to make it dairy-free? Use coconut oil instead of butter and skip the cream cheese. If you still want to make the sweet potato topping creamier, you can try adding a little coconut milk when mashing. And if dairy isn’t a concern at all, shepherd’s pie with cheese on top is also delicious!

I make this recipe with ground beef since it’s easy to get, but you could also use ground lamb for a more traditional taste. If you want a lower calorie or fat version, ground turkey works well. And while I’m not vegetarian, I’ve heard cooked lentils also work well instead of the ground meat. 

Quick Tips

To save time on the sweet potatoes you can bake them ahead of time. I’ll make some earlier on in the week and pull them out of the fridge when needed. You can bake them for about an hour until soft. For a faster version, boil diced sweet potatoes for about 10 minutes, drain, then use for this recipe. 

I’m big on meal prep and this is a great recipe to make ahead. You can even bake the ingredients in pint-sized mason jars for easy packable lunches!

Store any leftovers in the fridge for up to 4 days, or freeze for up to 3 months. To freeze, place the unbaked, layered, shepherd’s pie in a freezer safe container and wrap tightly. Let it thaw in the fridge before baking for 30 minutes at 350. I like doubling the recipe and freezing half for later. 

If you love sweet potatoes as much as we do, give this recipe a try!

Sweet Potato Shepherd’s Pie Recipe

This healthier take on shepherd’s pie features a creamy sweet potato topping. This is a family favorite at our house and my kids love helping make the layers.

  • Preheat the oven to 350°F

  • In a large skillet over medium heat, brown the meat.

  • Mix in 1 teaspoon of the salt and all remaining seasonings and transfer to a large bowl.

  • Saute the onion and kale in the skillet until slightly soft and add to the meat.

  • Pour the mixed vegetables into the skillet and heat on low heat. 

  • While the vegetables are heating, mash the cooked sweet potatoes with butter and the remaining 1/2 teaspoon salt until smooth. 

  • Add the mixed vegetables to the meat mixture, sprinkle the arrowroot on top, and stir to combine. 

  • Pour the meat/vegetable mixture into a 9×13 baking dish and spread in an even layer. Add the mashed sweet potatoes and smooth evenly over the top.

  • Bake at 350°F for approximately 30 minutes.

  • When done, top with a small dollop of cream cheese if desired and enjoy.

Nutrition Facts

Sweet Potato Shepherd’s Pie Recipe

Amount Per Serving (1 serving)

Calories 490
Calories from Fat 243

% Daily Value*

Fat 27g42%

Saturated Fat 14g88%

Trans Fat 1g

Polyunsaturated Fat 1g

Monounsaturated Fat 9g

Cholesterol 117mg39%

Sodium 793mg34%

Potassium 947mg27%

Carbohydrates 33g11%

Fiber 6g25%

Sugar 7g8%

Protein 28g56%

Vitamin A 20036IU401%

Vitamin C 23mg28%

Calcium 136mg14%

Iron 4mg22%

* Percent Daily Values are based on a 2000 calorie diet.

  • Store any leftovers in the fridge for up to 4 days, or freeze for up to 3 months. 

Is It Shepherd’s Pie or Cottage Pie?

Shepherd’s pie is Irish in origin and usually is made with ground lamb. Cottage pie is British and made with ground beef. However, most people don’t quibble over the small differences and use the terms interchangeably. Read more fun shepherd’s pie facts here.

Sweet Potatoes: Versatile, Healthy, and Delicious

My kids absolutely love sweet potatoes and happily eat them every way I fix them. Which is why I have such an extensive and creative collection of sweet potato recipes! Here are some others to try:

Ever make shepherd’s pie with sweet potatoes? How’d it turn out? Share below!

Tags: , , , , , ,
Best oLive
Privacy Overview

This website uses cookies so that we can provide you with the best user experience possible. Cookie information is stored in your browser and performs functions such as recognising you when you return to our website and helping our team to understand which sections of the website you find most interesting and useful.