Homestead Blog Hop - Homestead tips, ideas, animal care, and recipes every Wednesday

Homestead Blog Hop 602 – Making Strawberry Bread and Homesteading

Welcome to Homestead Blog Hop, a weekly gathering for homesteaders and simple living enthusiasts to share DIY projects, from-scratch recipes, and creative inspiration. This week’s hop features cozy homesteading tips, along with practical ideas that celebrate handmade living and self-sufficiency.

Whether you’re looking for seasonal crafts, homemade treats, or encouragement on your homesteading journey, you’ll find plenty of inspiration to carry into the new year. Grab a cup of tea, explore the featured posts, and join us in sharing your own homestead creations.

Meet Your Homesteading Hosts

We’re Kelly from Simple Life Mom, Liz from The Cape Coop, Natasha from Houseful of Nicholes, and Laurie from Ridgehaven Homestead. Together, we’re passionate about from-scratch living, simple ingredients, frugal habits, and intentional homesteading. We’re delighted to host the Homestead Blog Hop, where you can find fresh inspiration each week for DIY projects, homemade recipes, and practical simple living ideas.

Follow Us for More Homestead Inspiration

Natasha – Houseful of Nicholes
Facebook | Pinterest | X | Instagram

Laurie – Ridge Haven Homestead
Facebook | Pinterest | Instagram

Liz – The Cape Coop
Facebook | Pinterest | X | Instagram

Kelly – Simple Life Mom
Facebook | Pinterest | X | Instagram

FEATURED POSTS from the Last Homestead Blog Hop

Each week, we take turns selecting three featured posts from the Homestead Blog Hop. These features are shared across all of our social media platforms, helping spotlight the creativity and hard work of our fellow homesteaders. Here are the featured posts from last week’s hop:

1. Strawberry Star Bread Recipe from Ann’s Entitled Life

2. Before You Buy Homestead Tools: Ask These Two Questions First from The Once and Future Homestead

3. How To Cook Dandelions Easy and Tasty from Recipe Ideas Shop

Congrats! Feel free to grab the featured on button for your post.

Just right click and ‘save image as…‘

Guidelines for the Homestead Blog Hop

  1. Click the “Add Your Link” button below and upload a clear, eye-catching image from your project or recipe. Please link directly to the family-friendly post itself, not your blog’s homepage.
  2. You may link up up to three posts each week.
  3. Take time to visit a few other blogs in the hop and leave a thoughtful comment to let them know you stopped by. Community support makes this hop special!
  4. Please include a link back to the Homestead Blog Hop in your post. Posts without a backlink are not eligible to be featured. All featured posts are shared across all hosts’ social media channels.
  5. Share posts that haven’t been linked to the hop before. Older posts are welcome as long as they are new to the hop.
  6. By joining the Homestead Blog Hop, you grant the hosts permission to use one image from your post, with a link back to your site, if your post is selected as a feature next week.
  7. This is a family-friendly link-up designed to encourage, inspire, and support the homesteader in all of us.

Let the Party Begin!

Which project are you excited to try this week? Leave a comment below.

Join Our Homestead Blog Hop Pinterest Board

Follow all of your hosts on Pinterest and send a message if you’d like to be added to our Homestead Blog Hop group board. This board is a great place to share your DIY projects, crafts, and from-scratch recipes with the homesteading community.

Guideline: Only pin posts that you’ve linked up to the Homestead Blog Hop.
Tags: , , , , , ,
Homestead Blog Hop - Homestead tips, ideas, animal care, and recipes every Wednesday

Homestead Blog Hop 596 – Making Jam and Earth Day Crafts

Welcome to Homestead Blog Hop, a weekly gathering for homesteaders and simple living enthusiasts to share DIY projects, from-scratch recipes, and creative inspiration. This week’s hop features cozy homesteading tips, along with practical ideas that celebrate handmade living and self-sufficiency.

Whether you’re looking for seasonal crafts, homemade treats, or encouragement on your homesteading journey, you’ll find plenty of inspiration to carry into the new year. Grab a cup of tea, explore the featured posts, and join us in sharing your own homestead creations.

Meet Your Homesteading Hosts

We’re Kelly from Simple Life Mom, Liz from The Cape Coop, Natasha from Houseful of Nicholes, and Laurie from Ridgehaven Homestead. Together, we’re passionate about from-scratch living, simple ingredients, frugal habits, and intentional homesteading. We’re delighted to host the Homestead Blog Hop, where you can find fresh inspiration each week for DIY projects, homemade recipes, and practical simple living ideas.

Follow Us for More Homestead Inspiration

Natasha – Houseful of Nicholes
Facebook | Pinterest | X | Instagram

Laurie – Ridge Haven Homestead
Facebook | Pinterest | Instagram

Liz – The Cape Coop
Facebook | Pinterest | X | Instagram

Kelly – Simple Life Mom
Facebook | Pinterest | X | Instagram

FEATURED POSTS from the Last Homestead Blog Hop

Each week, we take turns selecting three featured posts from the Homestead Blog Hop. These features are shared across all of our social media platforms, helping spotlight the creativity and hard work of our fellow homesteaders. Here are the featured posts from last week’s hop:

1. How to Hard Boil Eggs in an Instant Pot from Ann’s Entitled Life

2. Savory Peach Rosemary Jam Recipe from Flour on my Face

3. Earth day, every day! GRAND ways to celebrate! from Our Grand Lives

Congrats! Feel free to grab the featured on button for your post.

Just right click and ‘save image as…‘

Guidelines for the Homestead Blog Hop

  1. Click the “Add Your Link” button below and upload a clear, eye-catching image from your project or recipe. Please link directly to the family-friendly post itself, not your blog’s homepage.
  2. You may link up up to three posts each week.
  3. Take time to visit a few other blogs in the hop and leave a thoughtful comment to let them know you stopped by. Community support makes this hop special!
  4. Please include a link back to the Homestead Blog Hop in your post. Posts without a backlink are not eligible to be featured. All featured posts are shared across all hosts’ social media channels.
  5. Share posts that haven’t been linked to the hop before. Older posts are welcome as long as they are new to the hop.
  6. By joining the Homestead Blog Hop, you grant the hosts permission to use one image from your post, with a link back to your site, if your post is selected as a feature next week.
  7. This is a family-friendly link-up designed to encourage, inspire, and support the homesteader in all of us.

Let the Party Begin!

Which project are you excited to try this week? Leave a comment below.

Join Our Homestead Blog Hop Pinterest Board

Follow all of your hosts on Pinterest and send a message if you’d like to be added to our Homestead Blog Hop group board. This board is a great place to share your DIY projects, crafts, and from-scratch recipes with the homesteading community.

Guideline: Only pin posts that you’ve linked up to the Homestead Blog Hop.
Tags: , , , , , , ,
A visual guide to common soap making problems, including seizing, cracking, separation, and overheating, with natural solutions for beginners.

Soap Making Troubleshooting Guide: Why Your Soap Didn’t Turn Out Right (And How to Fix It)

Making homemade soap is such a beautiful, simple skill to learn—but if you’ve ever had a batch go wrong, you know how discouraging it can feel. One minute everything looks perfect, and the next you’re in the middle of soap making troubleshooting because your soap is thickening too fast, cracked, crumbling, or just… wrong.

Here’s the good news: every soap maker has been there. Every mistake is part of the learning process, and most problems are completely fixable—or preventable next time.

This guide will walk you through the most common soap making problems, why they happen, and how to fix them using simple, practical, real-life solutions to get you on the right path.

After all, learning homemaking skills like soap making isn’t just about the end product—it’s about stewardship, patience, and building something meaningful for your home and family. Mistakes are part of learning, and every imperfect batch is still a step toward wisdom, confidence, and self-sufficiency.

Table of Contents

  • Quick Soap Making FAQ
  • Why Did My Soap Seize?
  • Why Did My Soap Separate?
  • Why Is My Soap Too Soft?
  • Why Did My Soap Crack on Top?
  • Why Did My Soap Change Color or Fade?
  • Why Is My Soap Sweating?
  • Why Doesn’t My Soap Lather Well?
  • Why Are There Air Pockets or Tunnels?
  • Why is My Soap Chalky and Crumbly?
  • Why Does My Soap Smell Bad?
  • Gentle Reminders for New Soap Makers

Soap Making Troubleshooting Quick FAQ:

Good soap making starts with great techniques and great recipes. Make sure to read my articles on both so you start with great quality.

Here are my most common questions with rapid answers up front!

Can failed soap be saved?
Yes! Most failed soap can be re-batched or hand-milled (melted and remolded). Learn how here.

What does seizing mean in soap making?
Seizing is when soap batter thickens suddenly due to high temperatures, using fragrance oils, using hot essential oils like cinnamon and clove, or over-mixing. Change to essential oils and soap at cooler temperatures.

Why does my soap get a white powder on top?
That’s soda ash. It’s harmless and can be rinsed or gently shaved off.

Why are lye pockets in my soap after curing?
If you have liquid pockets that give you that slick feeling on your fingers when you feel it, you know it’s lye. You didn’t mix enough and then poured too cool. The oils and lye water didn’t emulsify and separated, not fully saponifying. But don’t worry. As long as you know that you used the right ingredient amounts, you can hand-mill (re-batch) the soap. Learn how here.

So, lets dive into the meat of each topic to make sure you minimize problems in the future, or at least know what to do when they happen.

Soap Making Troubleshooting Guide

Why Did My Soap Seize?

What it looks like: Soap batter suddenly turns thick, grainy, and chunky, like lumpy mashed potatoes.

Common causes:

  • Essential oils or fragrance oils that accelerate trace: Some essential oils are considered “hot” oils and will accelerate trace. If you’re going to make a Fall soap with cinnamon, clove, or nutmeg, then lower the temperature of your oils and lye water slightly more than usual to accommodate this issue.
  • Soaping at high temperatures: When soap making temperatures are above 100 degrees Fahrenheit, soap can come to trace faster.
  • Over stick blending: Using a stick blender can cause soap to come to trace a lot faster than a whisk or hand mixer. Pay close attention.
  • Heavy water discounting: If you don’t use enough water in your recipe, you can have a whole host of problems. The primary issue is lye being concentrated in a way that creates lumps of saponified oil before the other oils can be mixed evenly.

Simple fix:

  • Stop blending with the stick blender. Use a spoon if you need to finish mixing in scent or natural soap colorant but work as fast as you can.
  • Spoon the soap into your mold as quickly as you can.
  • Press firmly and texture the top for a rustic look.

How to prevent it next time:

  • Don’t use Fragrance oils. Use essential oils instead.
  • Soap cooler (80–100°F). If you’re using a recipe with a lot of hard oils like lard, cocoa butter, coconut oil, you have a higher likelihood of saponifying quickly.
  • Hand-stir essential oils into the soap instead of stick blending if you notice it came to trace quickly.
  • Always research scent behavior. There are “hot” essential oils like cinnamon and clove that will cause soap to come to trace quickly.

Why Did My Soap Separate?

What it looks like: Oil pooling, watery layers, or curdled soap batter.

Common causes:

  • False trace: False trace is rare if you measured correctly and your temperatures are right. But if your soap is too cold and you don’t stir enough, you can get results that you don’t see are messed up until you try to take the soap out of the mold.
  • Incorrect measurements: soap recipes are very precise. Measurements are scientific for a chemical reaction. If you measure precisely, you will have a lot less problems.
  • Not enough mixing: If lye water isn’t mixed enough, the water won’t be emulsified into the oils. This will cause pockets of lye water to separate as it sits in the mold.
  • Curing temperature too cold after limited mixing: If didn’t mix great, but you have warm temperatures, sometimes you can luck out and the soap turns out ok. But if you undermixed and then temperatures are too cold it’s a definite combination for lye pockets.

Simple fix:

  • If you catch it before it sets up, re-blend until fully emulsified.
  • If it’s already molded, don’t worry. It can be fixed. If you had a scale problem or forgot something, try to figure out what you did. You can always re-batch or hand mill the batch and add the missing ingredient to fix it. If you didn’t mix enough, hand-mill and mix well.

How to prevent it next time:

  • Always weigh ingredients carefully.
  • Match oil and lye temperatures to at least 80 degrees Fahrenheit.
  • Blend to emulsion. Look for light trace.

Why Is My Soap Too Soft?

What it looks like: When unmolding the soap, your hand may leave fingerprints, or the soap is extremely soft or even fully liquid.

Common causes:

  • Too much water: Double check your recipe and make sure the water amount is correct. It should be 32-38% of the oils.
  • High olive oil content and not enough hard oils: Castile and Bastille soaps can be very soft when first unmolded.
  • Superfat content too high: Too many oils compared to lye water will leave your soap slightly softer than a lower superfat content. Common amounts are 5-15%, unless you are making a salt bar recipe.
  • Not cured long enough: Most of the time, the soap just needs to sit in the mold for a little longer or be cured for a few more days.

Simple fix:

  • Leave it in the mold longer.
  • Put it in the freezer before unmolding.
  • Let it cure longer (3-4 weeks).
  • Rebatch with harder oils if needed.

How to prevent it next time:

  • Edit recipe in lye calculator with coconut oil, tallow, lard, or cocoa butter
  • Slightly reduce water if water content is too high.

Why Did My Soap Crack on Top?

What it looks like: It looks like a crack in a river bed and the soap is a lot darker than usual. When soap overheats it darkens and cracks, as if it is boiling beneath the surface and heat has to escape somehow.

Common causes:

  • Overheating due to hot essential oils or using fragrance oils.
  • Heavy insulation in an already warm room.
  • Sugars or milk cause overheating during saponification: Just like how soap curds can burn when added to water, it also speeds up saponification and creates heat quickly. Always keep this in mind when adding milks and sugars (honey, manuka, etc.)

Simple fix:

  • Cool as soon as possible when you notice it. Place it in the refrigerator for a few minutes to cool it down.
  • Gently press cracks together while warm.
  • Plane the top after curing.

How to prevent it next time:

  • Don’t heavily insulate if the room is already in the mid 70s Fahrenheit.
  • Soap at cooler temperatures if that recipe tends to harden quickly or the oils cause it to set quickly.

Why Did My Soap Change Color or Fade?

What it looks like: Soap is one color when it’s molded, but another when you unmold it. Turmeric is yellow but turns tan. Alkanet root is purple, turns blue, then turns purple again. Beet root is a beautiful pink but turns brown when added to soap.

Common causes:

  • Fading or lye effected natural colorants, especially root powders and herbs.
  • Gel phase: The gel phase is when soap warms to a consistent temperature and goes into gel phase which is a natural glycerin transition time during the first 24 hours of saponification. Gel phase will darken a white soap slightly but is good for coloring when trying to bring out more vibrant colors.

Simple fix:

  • Embrace the natural patina. Soap colors will change based on temperature and colorant used. It’s a beautiful natural process.
  • Learn what changes and how so you can change your recipe as needed for next time.

How to prevent it next time:

  • Research how essential oils change colors in soap. Some will darken the soap bar a lot more than others.
  • Use clays, oxides, and stable botanicals that don’t change color. Clays are pretty consistent. Rose clay, Moroccan clay, or even charcoal are some of my favorites. Check out my book for a full color description and chart of herbs and
  • Control gel phase by not letting it enter gel phase (let it get warm enough for saponification, and not any warmer), or make sure it fully gels for a richer, darker color and harder finished soap.

Why Is My Soap Sweating?

What it looks like: There will be little beads of “sweat” all over the soap as it’s curing. Sometimes it’s enough that there is a pool of liquid under the soap where it sits.

Common causes:

  • This is usually glycerin dew, and it’s very common in humid climates.
  • You probably have a very high glycerin soap.

Simple fix:

  • Store in a dry, cool space.
  • Wrap fully once it’s cured to keep glycerin from beading outside the soap bar.

How to prevent it next time:

  • Cure in low humidity.
  • Avoid airtight curing containers. Let your soap sit out on a table for the first week at least.

Why Doesn’t My Soap Lather Well?

What it looks like: There may be tiny bubbles, but no big lather like you wanted.

Common causes:

  • Too much olive oil. Olive oil or Castile bars don’t have much cleansing power and don’t create bubbles without additives.
  • High superfat: If your soap recipe has a very high superfat content (20% or more), the oils can be weighed down by the extra oils available in the soap bar.
  • Low bubble creating oils: Every oil in a soap recipe has a purpose. If the recipe hasn’t been put together well, it may not account for moisturizing, cleansing, or lather. Learn more about lathering oils.
  • Hard water: The minerals in hard water will kill the bubbles. They also affect your hair, so keep this in mind when switching to natural shampoo bars.

Simple fix:

  • Use a soap saver like this one.
  • Use a water filter to soften hard water.

How to prevent it next time:

  • Balance bubbly and creamy oils.
  • Make sure there’s enough coconut, babassu oil, or castor oil to create a good lather.

Why Are There Air Pockets or Tunnels?

What it looks like: When you take your soap out of the mold and cut it, there are air pockets or tunnels running through your soap.

Common causes:

  • Pouring at thick trace. If the soap is thick, air pockets can be trapped as you pour or scoop the soap into the mold.
  • Not tapping the mold. Tapping the mold gently on a table or countertop can help bubbles escape if the soap is thin enough.

Simple fix:

  • Embrace the unique bar and enjoy it!
  • Hand-mill the finished bar. Your soap will still look rustic, but it won’t have the air pockets on the inside.

How to prevent it next time:

  • Pour at light trace.
  • Tap molds firmly to get air pockets out of the soap.

Why is My Soap Chalky and Crumbly?

What it looks like: The soap is white and chalky and crumbles in your hand. It also may be chalky only on the corners of the mold but solid in the center.

Common causes:

  • Soap is lye heavy. When too much lye is used, soap can become crumbly and chalky.
  • Soap was too cold when within the mold in the first 24 hours. When I’ve poured soap in the winter time, I’ve added a space heater and covered the mold with a towel and can still have the corners get crumbly. This is because the corners became too cold and there wasn’t proper saponification.

Simple fix:

  • If the batch is crumbly only on the outside due to the cold while in the mold, cut those areas off and use the rest of the soap.
  • If the batch was lye heavy, add the soap to a slow cooker as you would when re-batching any soap, but add oil during the process. If you have no idea how much extra lye you added, this can be a risk and you can still have lye heavy soap, but I’ve usually been able to figure out what I’ve done, or I’ve added enough oils that I know the soap is now fine for home use. If you are not sure, discard the batch.

How to prevent it next time:

  • Measure everything very carefully.
  • Make sure your soap is molded warm and kept warm for the first 24 hours. 75 degrees is usually a great temperature to make sure overheating, or soaping that’s too cold doesn’t occur.

Why Does My Soap Smell Bad?

What it smells like: There’s a dusty scent. Something is off.

Common causes:

  • Old or rancid oils.
  • Improper storage. Soap was left out in a hot and humid environment or has a lot of botanicals within it, causing it to go bad faster.
  • Expired fragrance oils.

Simple fix:

  • Discard the batch. There’s nothing else to do if you have rancid oils.

How to prevent it next time:

  • Use fresh oils.
  • Only use essential oils for an indefinite shelf life while still in the bottle.
  • Store soap in a cool, dry environment and store in plastic containers if possible when cured.

Gentle Reminders for New Soap Makers

  • Measure carefully. The smaller the batch, the more specific you need to be.
  • Keep recipes simple until you learn more about ingredients and what they do in soap. You can learn more about soap making oils here.
  • Don’t rush trace. Know what trace is and what you want for your specific recipe. Some soaps you want to pour at light trace so you have time to include colors. Others need to be thicker so you can create swirls or layers.
  • Insulate for 24 hours, longer if soap is still soft. Then cure for 3 weeks so your soap is hard and lasts longer.
  • Enjoy experimenting!

Soap making isn’t about perfection; it’s about learning, growing, and building a simple, natural skill for your home or small business. Every batch teaches you something new, and even the mistakes have value.

Save this guide, come back to it when something goes wrong, and remember: you’re learning a real homestead skill, and that takes time.

If you have a question that wasn’t answered, ask it here.

Tags: , , , , , ,
6 Surprising Mistakes You Didn’t Realise You’re Making

6 Surprising Mistakes You Didn’t Realise You’re Making

Many people invest time, money and effort into their skincare routine only to wonder why their skin still looks dull, irritated or prone to breakouts. The truth is, most skincare failures don’t come from a lack of products—but from small, everyday mistakes that quietly disrupt the skin’s natural balance. These errors often go unnoticed, yet they can stop even the most premium products from working the way they should.

If you’re constantly switching products or adding new ones, it may be time to rethink your basics. Here are the six hidden mistakes that could be holding your skin back.

1. Treating Only What You See

Most of us chase surface issues like redness, dryness or acne, but these symptoms are only reflections of deeper imbalances. Persistent concerns often arise from internal factors—fluctuating hormones, immune responses or disturbances in the skin and gut microbiome. Without addressing the root cause, topical products can offer only temporary relief.

2. Ignoring the Gut–Skin Connection

Your gut and skin are closely linked. When the gut microbiome becomes imbalanced, it can trigger inflammatory reactions that show up on the skin as acne, eczema, rosacea or unexplained sensitivity. A weak digestive environment can silently fuel recurring skin problems, no matter how elaborate your skincare routine is.

3. Damaging the Barrier With Too Much Exfoliation

Exfoliators are meant to brighten the skin, but overdoing them can backfire. Frequent use of scrubs, chemical peels or strong acids weakens the protective barrier layer. Once compromised, the skin loses moisture easily and becomes prone to irritation, breakouts and premature ageing. Gentle, controlled exfoliation is far more beneficial than aggressive routines.

4. Mixing Potent Actives Without Understanding Them

Popular ingredients like retinol, vitamin C, niacinamide and exfoliating acids have specific pH levels and compatibility rules. Layering them incorrectly can neutralise their effectiveness or irritate the skin. Additionally, harsh cleansers or strong soaps can disturb the skin microbiome, causing imbalance and sensitivity. Understanding how ingredients work together is crucial for a safe and effective routine.

5. Expecting Results Faster Than Your Skin Can Adapt

Skin regeneration, barrier repair and collagen production all take time. Constantly switching products interrupts these natural processes and leaves the skin confused and stressed. A consistent routine, rather than a crowded one, is the foundation of healthy skin. Slow and steady transformation is more realistic than overnight miracles.

6. Overlooking Lifestyle Factors That Influence Skin Health

Your skin responds to everything—stress levels, sleep quality, diet, medications and daily environmental exposure. For instance, prolonged stress can increase cortisol, leading to excess oil production and inflammation. No topical product can fully counter lifestyle-related triggers. Balanced habits are just as essential as good skincare.

Healthy, glowing skin isn’t built on expensive products but on mindful habits and scientific understanding. By avoiding these six common mistakes, you can help your skin regain stability and achieve long-lasting radiance.

Tags: , , , , ,
eyewig

‘Eye Wig’ Eyeshadow Hack: Would You Try The New Beauty Trend Making Waves On TikTok?

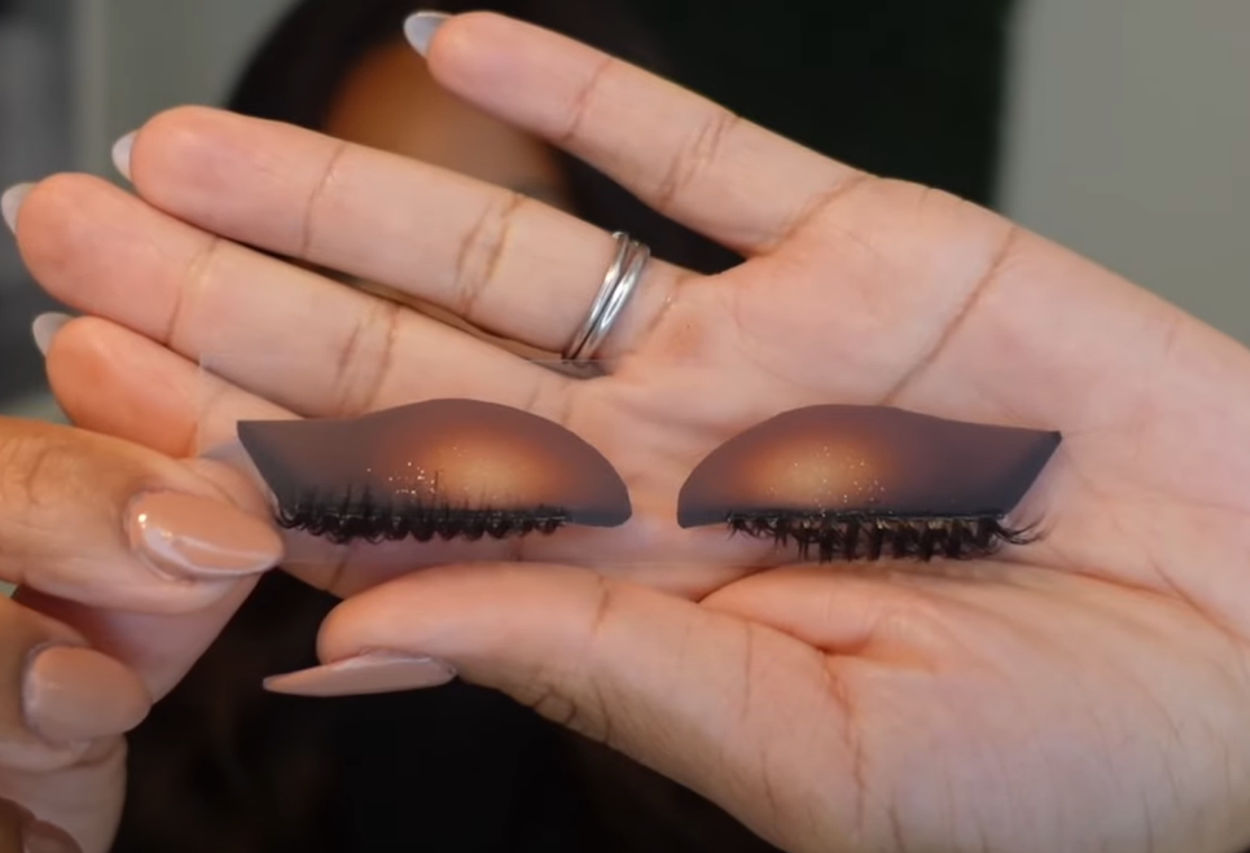
A new beauty trend on TikTok is causing quite a stir. It’s called the ‘eye wig’ — yes, a wig for your eyelids. This innovative eyeshadow hack promises beautifully defined eyes but makeup-free eyelids all day, without the struggles of applying eyeshadow.

The buzz began when beauty creator Nicole Fay shared her try-on video, which quickly went viral. The clip has racked up 6.9 million views, 420,000 likes and more than 3,000 comments, sparking debate across the platform about whether this unusual product is genius or gimmick.

The ‘Eye Wig’ Eyeshadow Hack

Fay followed the tutorial at the start of her video and showcased the product with visible excitement. ‘Okay, ’cause I need to try this. ‘Cause… what? I waited like a month for this to arrive. This is basically an eyeshadow wig, and it’s really good for girls who aren’t great at eyeshadow, like me. So I want to try this because if it’s legit, this is such a great little hack. Did you see how her eyes came out? It looks like eyeshadow! But let’s put this to the test, because I don’t know.’

She explained that there are three different styles to choose from and that she had ordered the Hazel Halo with half lashes. At first, the product looked a little odd, but after trimming the ‘wig’ to fit her eyelids, it began to work.

‘It’s looking a little scary right now, but I think they’re a good fit for my eyes. I’m going to finish the rest of my face and then come back. Okay, give me a second. Are you ready for the final reveal?’

Once her full glam was complete, the result was striking. Fay laughed at her own reflection:

‘Ah, it’s cute. I like it. Does it look like there’s something on my eyelid that shouldn’t be there? Be honest. I don’t know… I like it, haha,’ Fay said.

Nicole Fay visibly happy with the ‘eye wig’.
PHOTO: SCREENGRAB NICOLE FAY/TIKTOK @NICOLEFAY_

She rated the product, saying, ‘If I had to give it a score out of 10, I’d say 7, because I’m not sure I’d wear these every day. But what do you guys think? Would you try this?’

Comments on her video were mixed, from praise to scepticism:

  • ‘This is amazing for cancer patients and girls with alopecia 🙌🏻.’
  • ‘Giiirrrrrllll, this is genius 🤭🤭🤭.
  • ‘Omg, they look so good, I like this idea.’

Others were amused by the name, ‘Eyeshadow wig is sending me 😂😂😂😂.’ Some were sceptical, ‘Imagine seeing that on the floor and thinking someone’s eyelid blew off 😭,’ with one user adding, ‘That CANNOT be comfortable.’

Meet the Innovator: Mara Porter

This ‘eye wig’ is officially called ‘iLIDS™’, the world’s first eye wig, created by four-time Emmy-winning journalist, Webby Awards winner, host, and beauty innovator Mara Porter.

Mara Porter, the innovator behind ‘eye wig’ or iLIDS™
PHOTO: MARA PORTER / MARAPORTER.COM

Porter is known for her DIY beauty and makeup hacks, and the idea for the ‘eye wig’ stemmed from a video of her putting a band-aid on her eyelids. The clip sparked numerous comments urging her to patent the idea and launch a business — which she did, with remarkable success.

In an exclusive interview with MadameNoire, Porter revealed she had been conceptualising the idea for years: ‘I’ve had this idea in my head for 20 years, because I had to get ready for TV every day for 15 years — that’s a full beat every single day,’ she explained.

She recalled applying false lashes in a car during a hurricane before going live on air:
‘I was like, “Let me put these on,” because being in a hurricane without lashes on doesn’t work when you’re on TV.’

How the ‘Eye Wig’ Works

According to Mara Porter’s website, iLIDS™ are crafted from a medical-grade, skin-safe, latex-free material, making them hypoallergenic and suitable for all skin types. Initially, the adhesive may feel non-tacky, but becomes sticky as it warms with body heat.

iLIDS™ are reusable and washable, so you can gently peel them off, clean them, and store them on their original backing for future use.

Using iLIDS™ is simple: just align the ‘eye wig’ over your eyelid, press it gently into place, and it instantly creates the appearance of fuller, more defined lashes or lids — without the need for mascara, lash extensions, or other traditional makeup products.

Because they’re cosmetic-safe, they can even be used by people with lash extensions or complete lash loss, offering a quick, fuss-free way to enhance your eye look.

In the interview, Porter said that her innovation was ‘God-given’.

‘This is 100 per cent God-given, like, in me,’ she told MadameNoire about her passion for beauty. ‘God planted this seed in me because I’ve been like this as long as I can remember. Every obsession I had, the thing that drew me like a moth to a flame, was always beauty-related. I remember being so obsessed with the Jet Beauty of the Week.’

Whether you’re a makeup pro or a beginner, the ‘eye wig’ is proving that beauty doesn’t have to be complicated. With iLIDS™, you can achieve flawless, show-stopping eyes in seconds. Thousands are already experimenting with this viral TikTok sensation. Now, the question is: will you?

Tags: , , , , , , , ,
Best oLive
Privacy Overview

This website uses cookies so that we can provide you with the best user experience possible. Cookie information is stored in your browser and performs functions such as recognising you when you return to our website and helping our team to understand which sections of the website you find most interesting and useful.