DIY Shikakai Hair Mask for Stronger, Shinier Hair

DIY Shikakai Hair Mask for Stronger, Shinier Hair

When I was a tween – which wasn’t actually a word back then – my best friend and I regularly ransacked her kitchen to make all the “magical hair mask” recipes that magazines promised would give us shiny, flowing locks.

Mashed bananas. Avocados. Kiwi.

They never delivered the results, but we kept trying. Now I wish we’d just eaten the bananas.

As you can imagine, when I first heard about a plant that literally translates to “fruit for hair,” I was skeptical. It sounded like mashed-banana-hair-mask 2.0.

I’m so glad I was wrong.

Shikakai powder has become a regular part of my natural hair care routine because it does something very rare in the world of DIY “fruit for hair” recipes.

It actually works – leaving my hair soft and shiny while nourishing my scalp.

Let’s talk about what it is, what it actually does (with research), and how to use it in a way that works for your hair type.

What Is Shikakai Powder?

Shikakai (Acacia concinna) is a climbing shrub native to India and parts of Southeast Asia. In Ayurveda – India’s traditional system of medicine – it’s been used for centuries as a natural hair cleanser and conditioner.

Shikakai comes from two Tamil words – sigai means “hair” or “tresses” and kaay means “fruit.” So, hair fruit.

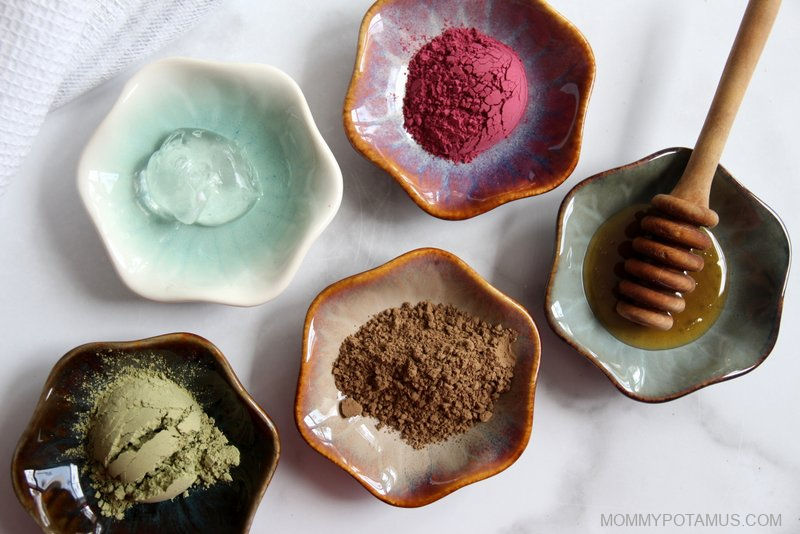
The powder is made from dried shikakai pods, which are ground into a fine powder. When mixed with water, yogurt, or aloe vera, it forms a paste that can be massaged into the scalp and hair.

Shikakai Is unique because it cleanses AND conditions simultaneously. That dual action is the foundation of its traditional use – and one of the many reasons it’s still so popular today.

Benefits of Shikakai Powder for Hair

1. Natural Cleanser

Shikakai cleanses without aggressively stripping the scalp’s natural oils. It contains saponins – which are plant compounds that help lift away light buildup and debris – which are more gentle than the detergents found in conventional shampoo (and even the surfactants used in non-toxic options). (1)

It leaves hair soft, balanced and refreshed – clean, but not stripped.

That said, it’s designed for gentle cleansing, not heavy-duty clarifying. If you regularly use silicones, thick styling waxes, or heavy oil treatments, you may need a stronger cleanser to remove that type of buildup.

2. Hair Strength & Fullness

In Ayurvedic tradition, shikakai powder is highly valued for its ability to support strong, thick, resilient hair over time. While I haven’t found clinical research showing that it directly stimulates new hair growth or increases follicle density, it does contain antioxidant compounds that may help protect both the scalp and existing strands from oxidative stress.

What that can look like in real life is hair that appears fuller – not because new follicles suddenly pop up, but because the hair you already have is better supported and less prone to breakage or shedding.

In other words, it’s association with reduced hair fall and more overall fullness might be because of:

  • Reduced scalp irritation, which supports a healthier growth environment
  • Improved oil balance, which keeps follicles from becoming clogged
  • Gentle cleansing that minimizes dryness and breakage
  • Antioxidant activity that helps buffer environmental stressors

So, it’not a miracle “growth booster” – but it can help create the conditions that allow your natural growth cycle to function more optimally.

3. Dandruff Reduction & Scalp Support

Shikakai powder is a traditional Ayurvedic remedy for flaky, itchy scalps, and modern research gives us a hint as to why it has been used this way. Phytochemical analyses show that Acacia concinna extracts contain compounds with antimicrobial and antifungal activity, including saponins, flavonoids, tannins, and other plant bioactives that have been shown to inhibit the growth of various bacterial and fungal species in petri dish (in vitro) lab tests. (2) (3)

Since dandruff is often linked to an overgrowth of Malassezia yeast on the scalp, this antifungal potential offers a plausible explanation for why so many people find shikakai soothing. (4)

That said, most of the research has been conducted in lab environments rather than large human trials, and shikakai hasn’t been definitively shown to eliminate Malassezia on its own. So while it may help support a balanced, comfortable scalp – especially in mild cases – it’s best thought of as a supportive option rather than a stand-alone solution.

4. General Scalp Support

Hormonal shifts (like perimenopause) can make the scalp more reactive and sensitive, and over the past year my old routine – which I had used for many years without issue – suddenly started making my scalp itch. When I swapped in shikakai, the irritation resolved almost immediately.

Over time, as I’ve continued using shikakai alongside other herbs, I’ve noticed that my hair feels a little fuller AND my scalp remains healthy and irritation-free. Win/win.

5. Softness & Shine

When pure shikakai powder is mixed with water, it has a slightly gritty texture. The first time I applied it, I remember thinking, “Exactly how is this supposed to be moisturizing?”

My expectations didn’t improve after I rinsed it out, either. While wet, my hair didn’t feel deeply conditioned or dramatically different in any way.

That’s why I was so surprised once it dried.

It was noticeably smoother, shinier, and softer than I expected.

The shine probably has something to do with the way shikakai gently cleanses without over-stripping and its naturally slightly acidic pH, which can help the hair cuticle lie flatter. When the cuticle is smoother, each strand reflects light better – and that’s what gives hair a glossy look.

Whatever the exact mechanism, it’s one of my favorite benefits.

One of the best things about DIY hair care is that you can customize your blend to fit your needs. Below is a quick guide to the most common ingredients mixed with shikakai – and what each one brings to the blend.

Liquid Bases

Warm Water
Helps activate saponins and creates a smoother paste. Warm water typically creates a better consistency than cold, but temperature doesn’t significantly change cleansing ability.

Yogurt
Adds lactic acid (for clarifying), fats for moisture, and protein for temporary strengthening. Good for dry or frizz-prone hair.

Aloe Vera Gel
Adds hydration and slip. Soothes irritated scalps.

Dry Add-Ins

Aloe Vera Powder
Powdered aloe vera works like the gel form, but you only need about 1/3 of the amount.

Amla (Indian Gooseberry) Powder
Traditionally used to enhance shine and conditioning. Contains vitamin C and antioxidants.

Reetha (Soap Nuts) Powder
Boosts cleansing and foaming. Ideal if hair feels oily.

Neem Powder
Traditionally used for scalp conditions. Has antimicrobial properties.

Brahmi (Bacopa monnieri) Powder
Used in Ayurveda to support scalp health and hair thickness.

Fenugreek Seeds or Powder (Soaked & Blended)

When fenugreek seeds are soaked in water overnight and then blended, they create a gel-like substance that improves the spreadability of the hair mask, increases the conditioning properties, and adds slip for detangling. For curly or dry hair, this can make shikakai significantly more user-friendly. Fenugreek is also sold in powdered form. It can be used the same way as the seeds, but you can stir it instead of blending.

Hibiscus Powder
Traditionally used to enhance shine and softness. Also said to help hair keep its color longer reducing oxidative stress on the scalp.

Oxidative stress on the scalp is a primary factor in premature greying. It happens when free radicals (reactive oxygen species) accumulate in the hair follicle, damaging the pigment-producing cells (melanocytes).

Bhringraj (Eclipta alba) Powder
Traditionally used in Ayurveda to support hair vitality and overall scalp health. It’s often included in herbal blends aimed at strengthening hair roots and reducing shedding. While much of the evidence comes from traditional use and animal studies rather than large human trials, bhringraj is widely valued in Ayurvedic hair care for promoting thicker-looking, more resilient hair over time.

In the recipes below, you’ll notice that the amounts are usually given as a range – for example, 2–4 tablespoons. These measurements are meant to be a starting point, since the exact amount you’ll need depends on your hair’s length, thickness, and texture.

After a batch or two, you’ll quickly get a feel for what works best for you and can adjust accordingly.

Before you get started, here are some tips and guidelines:

  • Shikakai hair mask may feel drying if used alone on moisture-depleted or brittle hair → In those cases, consider adding yogurt, aloe, or fenugreek.
  • Shikakai can irritate eyes → Rinse carefully.
  • Always patch test first → I recommend this for all DIY skin and hair care recipes including backuchiol serum, magnesium oil, and butterfly pea witch hazel toner. For the recipes below, a patch test might look like this:
    • Blend a small amount of your recipe together.
    • Apply a dab to your inner wrist or just behind your ear. Wait 24 hours and check for any redness, itching, or irritation.
    • Once you’re in the clear, it’s time to treat your hair to something special.

🌸 Basic Shikakai Hair Mask

Shikakai + Water
Best for normal to oily scalps / hair.

Ingredients

  • 2-4 tablespoons shikakai powder
  • Enough warm water to create a yogurt-like texture

Instructions

Mix ingredients together until they form a yogurt-like texture. To apply, work into wet hair from your scalp to the ends of your hair.

Apply to wet hair, working from your scalp to the ends of your hair.
Leave on 10–15 minutes.
Rinse thoroughly.

Note: It will not lather like commercial shampoo. That’s normal.

🫧 Cleansing Hair Mask

Shikakai + Reetha
Best for oily scalps, moderate buildup, post-workout hair, or when your roots feel weighed down.

Ingredients

This recipe adds reetha – also known as soapberry or soap nut – for cleansing oomph. Yes, that’s the technical term. 🙂

  • 1-2 tbsp shikakai powder
  • 1-2 tbsp reetha powder
  • Warm water

Instructions

Mix the ingredients together until they form a smooth, yogurt-like paste.

Apply to wet hair, starting at the scalp and gently massaging into the hair roots to support a thorough cleanse. Then work the mixture down through the lengths of your hair to the ends.

Leave on for 10–15 minutes.

Rinse thoroughly, making sure no residue remains at the roots.

Note: This blend may create slightly more lather than shikakai alone because of the reetha, but it still won’t foam like commercial shampoo – and that’s completely normal.

🌺 Conditioning Hair Mask

Amla + Shikakai
For hair that feels dry, dull, frizz-prone, or rough.

Ingredients

  • 1-2 tbsp shikakai powder
  • 1-2 tbsp amla powder
  • Optional: 2-4 tbsp yogurt or aloe vera gel (or 2-4 tsp aloe vera powder)
  • Optional: 1-2 tsp fenugreek powder (You can make your own by grinding fenugreek seeds in a coffee grinder.)
  • Warm water

If you’re adding fenugreek and starting with the whole seeds, make sure to grind them very finely, or you may find that you have trouble rinsing seed pieces out of your hair. (I use a coffee grinder.)

In a small bowl, combine the shikakai and amla powders. Add yogurt or aloe vera gel (or aloe powder + water) and stir until you reach a smooth, slightly runny yogurt-like consistency.

If you’re adding fenugreek powder, place it in a small separate bowl and mix it with a little bit of warm water.

Let the mixtures sit for about 5 minutes to thicken slightly, then combine them.

Apply to wet hair, starting at the scalp and gently working it into the hair roots. Then smooth it down through the lengths to the ends, making sure everything is evenly coated.

Leave on for 20–30 minutes.

Rinse thoroughly, taking a little extra care to remove any herbal residue at the roots.

🌿 Hair Mask for Fewer Flakes

Shikakai + Neem + Hibiscus + Aloe
For itchy, reactive, flake-prone scalps.

Ingredients

  • 1–2 tbsp shikakai powder
  • 1 tsp–1 tbsp neem powder (start lower if sensitive)
  • Optional: 2-3 tsp hibiscus powder
  • Optional: 1-2 tbsp aloe vera gel
  • Optional: 1–2 tsp honey
  • Warm water

Instructions

In a small bowl, combine the powders.

Add aloe vera gel and honey (if using), then add a little bit of warm water. Stir and add small amounts of water as needed until a smooth, yogurt-like paste forms.

Apply to wet hair, starting at the scalp. Gently massage into the scalp and hair roots, then smooth through to the ends.

Leave on for 15–20 minutes.

Rinse thoroughly, taking extra care around the roots.

Note: Neem can have a strong scent. If you’re new to it, start with a smaller amount and increase gradually.

🌺 Shine + Conditioning Boost Hair Mask

Amla + Shikakai + Hibiscus + Yogurt or Aloe
For dull hair that needs softness and light-reflecting shine.

Ingredients

  • 1–2 tbsp shikakai powder
  • 1–2 tbsp amla powder
  • 1 tbsp hibiscus powder
  • 1-2 tbsp yogurt or aloe vera gel
  • Optional: 1–2 tsp honey
  • Warm water

Instructions

In a bowl, combine shikakai, amla, and hibiscus powders.

Add yogurt/aloe vera gel and a small amount of warm water. Stir and keep adding water in 1 teaspoon increments until the mixture is smooth and creamy.

Apply to wet hair, working first into the scalp and hair roots, then smoothing through the lengths to the ends.

Leave on for 20–30 minutes.

Rinse thoroughly.

Note: If your hair tends toward dryness, yogurt may provide more conditioning than aloe alone.

🌾 Deep Strength + Roots Hair Mask

Bhringraj + Shikakai + Fenugreek + Water/Aloe
For hair that feels fragile, sheds more than usual, or needs extra support at the roots.

Ingredients

  • 1–2 tbsp shikakai powder
  • 1–2 tbsp c powder
  • Optional: 1–2 tsp fenugreek powder
  • Water or aloe vera gel (enough to create a yogurt-like paste)
  • Optional 1-2 tbsp brahmi powder

Instructions

If you’re adding fenugreek and starting with the whole seeds, umake sure to grind them very finely, or you may find that you have trouble rinsing seed pieces out of your hair. (I use a coffee grinder.)

In a bowl, combine shikakai and Bhringraj powder (and brahmi powder, if using)

Add water or aloe vera gel until you reach a smooth, slightly runny but spreadable consistency.

If you’re adding fenugreek powder, place it in a small separate bowl and mix it with a little bit of warm water.

Let the mixtures sit for about 5–10 minutes to thicken slightly, then combine them.

Apply to wet hair, gently massaging into the scalp and hair roots first. Work through the lengths to the ends.

Leave on for 20–30 minutes.

Rinse thoroughly, ensuring all herbal residue is removed at the roots.

Note: Fenugreek adds slip and makes this blend significantly easier to apply — especially for thicker or curly hair.

Not Sure Which One to Choose?

  • If your scalp feels greasy → 🫧 Cleansing Mask
  • If your scalp feels itchy or reactive → 🌿 Scalp Soothing Mask
  • If your hair feels dry or frizzy → 🌺 Shine + Conditioning Boost
  • If your hair feels fragile or sheds easily → 🌾 Deep Strength + Roots
  • If you just want simple and gentle → 🧴 Basic Mask

More Hair Care Recipes To Try

Herbal Detangler – If there are tears over tangles in your house, here are three homemade hair detangler recipes that are inexpensive and simple to make.

Natural Hair Gel – Want to tame flyaway frizz, keep curls in check, or style short hair with a non-toxic version of your favorite store-bought stuff?

Many of the styling gels on store shelves contain hormone disrupting fragrances and formaldehyde releasers, but you can make natural hair gel with just 1-3 simple ingredients.

Sources

  1. Almeida, C., Silva, A., Ferreira, I., & Teixeira, A. (2023) Natural alternatives to synthetic surfactants for hair care: A review. National Center for Biotechnology Information, U.S. National Library of Medicine.
  2. Wuthi-udomlert, M. (2011). In vitro Effectiveness of Acacia concinna Extract against Dermatophytic Pathogens. Journal of Mycology and Pathology
  3. Sang, S.-H., Akowuah, G. A., Liew, K. B., et. al. (2023). Natural Alternatives from Your Garden for Hair Care: Revisiting the Benefits of Tropical Herbs. National Center for Biotechnology Information.
  4. Batra, R., Boekhout, T., Guého, E., Cabañes, et. al. (2005). Malassezia Baillon, emerging clinical yeasts. FEMS Yeast Research

Share with a friend! 👇

Tags: , , , , ,
Gen Z travellers turning holidays into full-blown skincare adventures

Gen Z travellers turning holidays into full-blown skincare adventures

There was a time when travel meant chasing sunsets, collecting fridge magnets, and pretending you enjoy hiking. Then came digital nomads, coolcations and set-jetting. Now? Enter the Glowmads, the travellers who refuse to board a flight without SPF, a serum, and a solid skincare routine.

Yes, the holiday has had a glow-up.

Image credit : AI generated | Glowmads are proving that the world is best explored with a face mask, a facial, and a carefully curated selfie.

What even is a glowmad?

A Glowmad is a traveller who plans trips around beauty, skincare and wellness rituals. Think less “backpacking through chaos” and more “booking a facial between museum visits.” These are the people turning holidays into full-blown glowcations, where the main souvenir is luminous skin.

Reports suggest that a significant percentage of Gen Z travellers are intentionally seeking beauty treatments and skincare shopping while abroad. Travel is no longer just about escape. It is about elevation. Emotional healing, yes. But also glass skin.

Image credit : AI generated | Much like an offshoot of wellness travel, the trend is based on ultimate glow-up, beauty, skincare, and overall wellness.

Beauty is the itinerary

Glowmad travel is curated. Destinations are chosen for their reputation in beauty and wellness. South Korea for advanced skin clinics. Paris for iconic French pharmacy staples. Kerala for Ayurveda. Tuscany for mineral-rich thermal springs. The vibe is simple: arrive tired, leave transformed.

It is not just about spa robes and cucumber water. It is targeted, tech-forward treatments, spiritual cleansing rituals, and yoga retreats that promise inner peace and outer radiance. Even airports are part of the ritual, with travellers stocking up on duty-free make-up and skincare before take-off.

Image credit : AI generated | This style of travel, dubbed “glowcations, ” emphasises indulging in the best spa retreats, discovering local beauty products, and visiting destinations renowned for transformative wellness rituals.

Skincare at 30,000 feet

The Glowmad does not pause their routine mid-air. Airplane cabins may be dry, but their skin will not be. Travel-sized serums, face mists, sheet masks and SPF-infused moisturisers are now as essential as passports. Hydration is a lifestyle.

Image credit : AI generated | 2026 will see skincare and beauty rituals move beyond social media, influencing travel in many ways for some.

Who is driving it?

Primarily Gen Z and Millennials. Beauty influencers amplify the movement with in-flight routines and “pack with me” videos. Frequent flyers swear by compact, multi-tasking products to survive constant climate shifts.

The question for 2026 is simple. If your suitcase is not half spa kit, are you even travelling?

Tags: , , , , , ,
nervous system home

How to Build a Nervous System–Friendly Home

Ever come home after a long, stressful day and felt even more stressed once you stepped inside? Or if you’ve been at home all day with the kids and the mess and the noise has you wanting to pull your hair out? Our homes can be a welcoming, safe space, or they can add to the chaos.

Over the years, I’ve been learning and experimenting with what it looks like to create a nervous system–friendly home. I’ve shared pieces of this before, but I wanted to pull it all together in one place. These are the things that have worked for me and that I’ve dialed in over time. Many of them are free, most are simple, and all are easy enough.

The home is like a partner with our nervous system. Our environment is either reinforcing safety signals or subtle danger signals all day long. And for many of us, especially moms, the home is where the majority of our nervous system triggers live. One 2009 study even found a direct link to clutter and stress levels in women. 

My goal when I walk into my home is to feel like my nervous system is getting a comforting hug. It’s that feeling when your body relaxes and the tension starts to slip away, even without you noticing. 

How Our Homes Talk to the Nervous System

Our nervous system is constantly scanning. It’s noticing light cues, sounds, visual clutter, smells, temperature, predictability, and social cues. These signals happen hundreds or thousands of times per day.

When those cues lean toward “unsafe,” our baseline tends to stay in sympathetic mode, or fight-or-flight. When they lean toward “safe,” the body can relax into parasympathetic mode, where digestion, repair, connection, and sleep happen more easily.

I talk a lot about healthy foods and supplements, but these can’t work well when our nervous system is under constant stress. In this article, I’m walking through what’s made the biggest difference for me. See what resonates with you and what you’d like to add (or take away) from your space. 

Light: The Biggest Nervous System Lever in the Home

You’ve probably heard me talk about light a lot, and that’s because I really believe it’s one of the biggest cues we can send to the body. Light is a massive safety or danger signal, and in many cases, the right kinds of light are free or inexpensive. For me, light is at least as important as diet and supplements. And ideally, it’s a both-and situation. 

Getting natural sunlight first thing in the morning, preferably within an hour of sunrise, is a huge needle mover. Some easy ways I do this include stepping outside as soon as I wake up, often barefoot, and usually in my pajamas. I open the blinds fully during the daytime, and I’ll even open the windows (yes, even when it’s cold out!). 

Morning Sunlight

When that morning sunlight hits our eyes, it starts a hormonal cascade that helps bring everything into alignment. You’ll want to make sure the light isn’t being filtered through a window or glasses. Be sure not look directly at the sun though! I even know some people who wear blue-blocking glasses until they get outdoors, so sunrise light is the first thing that hits their eyes.

I like to stack this with other habits. If it’s not too cold, I’ll get my feet on the ground, do some grounding, and hydrate with mineral water while I’m outside. I keep a quart of salt water and/or minerals on my nightstand that’s easy to grab.

During the day, we actually want bright light. Blue light itself isn’t harmful, but it’s all about the timing. During the brightest parts of the day, blue light signals alertness and metabolism, something we want. I also like to get little “light snacks” by going outside in bright light for about 10 minutes in the afternoon. 

Inside the house, I use full-spectrum, non-flicker daylight bulbs during the day.

Evening Light Cues

Evening light is where I’m the most intentional. In a perfect world, we’re aware of our light environment after sunset. Bright light at night signals daytime to the body and can cause stress in our nervous system. 

Whenever possible, I try to eat earlier and give myself at least three hours before bed with no food and lower light. I switch to warmer, lower light bulbs that mimic the feel of sunset and campfire light. I use lamps instead of overhead lighting and keep light at eye level or below. Our ancestors had lower and warmer light sources from candles and fires. 

After sunset, I avoid bright LEDs and anything that signals daylight, including screens. When I do need screens, I use red filters or my Daylight computer that doesn’t have backlighting for writing or creative projects.

In my bedroom, I pull down the blackout shades after sunset, block outdoor artificial light, and turn on red-spectrum low-light bulbs. I’ll read or draw and try not to be on screens. For me, light structure and nervous system structure are directly related.

Peace and Quiet

Sound is another big trigger that people don’t always think to audit. Household noise can impact cortisol and the startle response, even when we think we’ve tuned it out. Things like a loud TV always being on, constant notifications, HVAC hums, appliances, or echoey rooms can all be stressors.

There are often simple shifts here. Adding textures can dampen sound. Lowering or turning off the TV helps. White noise can be calming. In my bedroom, I use a Jaspr air filter that also provides a really beautiful white noise sound.

Notifications are another big one. My phone is almost always on silent or airplane mode. I don’t like vibration or sound, and I check it only when I want to, instead of reacting to alerts. And at night, my phone goes in the charging drawer in the kitchen. 

Temperature and Nervous System Safety

Temperature is another often-forgotten stressor. Extreme temperatures are obviously stressful, but never having variation can also be confusing to the body. Interestingly, overheated homes are linked to increased irritability and stress hormones. Cooler temperatures, especially during sleep, support vagal tone.

During the day, I aim for a comfortable indoor range, but not overly warm. At night, I keep my bedroom much cooler, often in the 60s. Instead of heating the whole house, I prefer to pile on the warm blankets and use my Chilipad to cool the mattress. Some of my best sleep happens with windows open and cozy blankets, even when it’s cooler outside. 

And while we’re on the topic of temperature, using a sauna can help our bodies be more resilient to stressors. Sauna is known as a hormetic stressor, or the good kind of stress, that helps our body better self-regulate. 

Visual Load, Clutter, and Mental Stress

This is a big one, especially for women. Visual clutter is a drain on our nervous system and it increases stress levels. Every item we own is a micro-decision. I’ve heard the phrase, “Everything you own owns a little part of you,” and that really resonates.

Research shows that women are often more affected by visual load than men. Clutter often signals unfinished tasks, which can add (you guessed it!) more stress. Over time, I’ve focused more on simplifying and subtracting than organizing. Clearing surfaces, creating neutral spaces, and hiding visual noise with storage can help.

For me, decluttering hotspots like the entryway, kitchen counters, and the chair in my room has made a noticeable difference. Calm is not just an aesthetic, but a purposeful design strategy.

Bring the Outside In

When I imagine a calm space, being outside in nature is part of the picture. We’re wired for the safety cues that nature offers. There’s compelling data that spending time in nature benefits the nervous system and psyche, even over short periods.

In the same way, bringing nature into the home can act as a safety signal. Natural materials like wood, stone, clay, and natural fibers feel grounding. My home has lots of natural light, and I have more than a few plants in my bedroom. I’m incorporating more natural fabrics into my wardrobe and I love these linen bedsheets. 

I feel more peaceful when my home reflects nature, even in small ways.

Minerals are another way I bring nature into the home. I have mineralized water stations, sea salt in the kitchen, and bath setups with Epsom salt, sea salt, and essential oils. I keep a hydration corner in my kitchen with liquid minerals the kids and I add to drinks.

Grounding is another component. I love being barefoot outside, but indoors I also use natural fiber rugs and blankets. I like sitting on the floor, not just chairs. Outdoor spaces like patios and hanging chairs help blur the line between indoor and outdoor. 

Cozy Corners and Spaces

Emotional safety is foundational for our overall health. If our body is on edge and in fight or flight mode, it’s much harder for healing to happen. I’ve found that cozy, calming spaces in the home can be very regulating.

When my kids were younger, indoor yoga swings and hanging chairs were incredibly calming for their nervous systems. Movement is regulating for adults too. Most of our swings live outside now that we live in a pretty warm climate. 

Create calm nooks with warm blankets and inviting books. Try weighted blankets, and having designated quiet spaces to support regulation. Rituals and routines matter too. Morning routines and bedtime routines signal predictability and safety, especially for kids who thrive on some kind of structure. 

For me, evening rituals like sipping Cacao Calm or listening to calming music help signal that it’s time to slow down.

The Bedroom as a Nervous System Repair Station

If I had to prioritize one room, it would be the bedroom. Sleep is when repair happens, so the bedroom should support that as much as possible.

In my bedroom, I prioritize complete darkness with blackout curtains and no LEDs. I keep the room cool, use white noise, and minimize clutter. I don’t have a TV or screens in the room, and I try not to bring my phone or computer in. I don’t even have a dresser in my room as all of my clothes live in the closet, out of sight! 

I use linen bedding, a natural mattress, and keep mineralized water on my nightstand. The lighting is low and warm in the evening and I can instantly feel my body relax. It’s not so much about adding to the space, but taking away from it. Removing devices, blue lights, cables, clutter, and work reminders. My bedroom is for sleep and calm.

The Kitchen as a Nourishment Space

The kitchen can also be a nervous system regulation area. Hydration zones, visible minerals, and simplified tools make nourishment easier and less stressful. Keeping surfaces uncluttered and organizing for ease reduces overwhelm. I’ll also make sure that simple, healthy foods are visible so my kids can easily grab something. The goal is to make the kitchen feel like a place of nourishment, not stress.

The Snowball Effect

What I love about this is that a nervous system–friendly home doesn’t have to be expensive. Many of the most impactful changes are free. Opening blinds and windows, turning off overhead lights at night, decluttering, reducing noise, cooling the bedroom, and adding natural elements can all shift the nervous system.

This is about signals, not aesthetics. It’s not about having a fancy home, high-end furniture, or extreme minimalism where everything is white. It’s about turning your home into a nervous system ally. These small changes can have a compounding effect over time that can add up to big results. 

Final Thoughts On A Nervous System Supportive Home

Our homes are constantly sending signals to our nervous system, whether we realize it or not. When those signals support safety, regulation becomes easier and these small changes compound over time.

It’s not about having the perfect home, but learning to embrace more calm in an intentional way. These small shifts can help your home work for you and your family’s health. 

What are some ways you’ve created more calm in your home (or would like to)? Leave a comment and let us know!

Tags: , , ,
hair growth serum

DIY Hair Growth Serum (and What Really Helps Hair Grow)

When our body starts to feel overwhelmed by stress, illness, or shifting hormones one of the first places we can see it is our hair. Hormones affect nearly every aspect of health, and I’ve certainly seen the connection between hormones and hair growth firsthand.

After many years of pregnancy, nursing, and thyroid challenges, my body was tired. I remember standing at the bathroom mirror after years of elevated hormones from pregnancy and nursing. The postpartum hair loss finally hit… and boy did it ever.

I addressed the stress and hormone imbalance, and the hair loss slowed. But I still wanted something to help new hair grow more quickly and protect my scalp and hair. This homemade hair growth serum is the result.

Some women go to a dermatologist or beautician for hair concerns. I tend to go to my pantry. Like my homemade sea salt spray, this DIY hair serum for growth is affordable and uses nourishing ingredients to naturally support scalp health.

What Really Causes Hair Loss 

Hair loss rarely happens in isolation. It’s often a sign that something deeper is happening in the body. Common root causes include chronic stress, hormone shifts, thyroid imbalance, postpartum changes, nutrient deficiencies, and post-viral illness. When our body doesn’t have enough resources, it prioritizes keeping us alive. And hair doesn’t make the cut. 

Supporting hair growth starts from the inside. Prioritizing protein, iron, zinc, and B vitamins helps the body rebuild hair tissue. Managing stress through sleep, gentle movement, and nervous system support can also make a noticeable difference. For hormonal hair loss, balancing blood sugar and supporting thyroid and adrenal health can be helpful. 

While addressing the root cause is key, using products topically can also help. That’s where a scalp serum for hair growth can be beneficial.

Do Hair Growth Serums Actually Work?

The answer is, it depends. A serum won’t fix hormone imbalances or chronic stress on its own, but it can support scalp health and stimulate circulation, which helps hair follicles function better.

Treatments like minoxidil are widely used, and studies show they can sometimes work, but not without risks. There are plenty of natural ingredients that can work just as well or even better than the conventional options. Rosemary oil for one. One study showed it worked as well as minoxidil for certain types of hair loss. If you want a natural approach, a homemade serum is a gentle option.

So, what stimulates hair growth best? Healthy circulation, nutrients, lowering inflammation, and a healthy scalp all play a role. A serum can provide the support your scalp needs externally while lifestyle and nutrition address the issue from the inside.

Why Use a Hair Growth Serum?

A good hair serum for growth helps:

  • Stimulate circulation to the scalp
  • Nourish follicles with vitamins and minerals
  • Soothe irritation and dryness
  • Protect hair from environmental damage

Whether you’re looking for the best hair growth serum for women or a hair growth serum for men, the goal is the same: create a healthy scalp environment that supports regrowth.

Best Hair Serum for Hair Growth: DIY Recipe

This DIY serum combines herbs and essential oils traditionally used to support hair and scalp health. It’s gentle enough for regular use and water based so it doesn’t make hair feel really oily.

Key Ingredients in This Serum For Hair Growth

  • Nettle – Rich in iron and vitamins A, C, and K, along with potassium and magnesium. These nutrients are essential for healthy hair follicles. Helps stimulate hair growth and improve scalp health.
  • Horsetail – High in silica, a mineral that supports hair strength and elasticity. Silica is linked with thicker, shinier hair.
  • Aloe Vera Gel – Aloe vera gel naturally soothes the scalp. Its the base of the serum and helps reduce irritation and dryness. Aloe also provides lightweight hydration so it’s great for most hair types.

Essential Oils for Hair Growth

Not only do they smell good, but these essential oils help stimulate circulation and promote hair growth.

  • Rosemary oil is one of the most studied essential oils for hair growth. Some research suggests it may be comparable to minoxidil for certain types of hair loss.
  • Clary sage oil is traditionally used for hormonal balance and may be helpful for hormone-related hair loss. 
  • Lavender oil supports scalp health and has antimicrobial properties, which can help maintain a healthy scalp environment.

Together, these ingredients combine to create a powerhouse hair growth serum!

Hair Growth Serum Recipe

Help stimulate hair growth with this aloe vera, herb, and, essential oil recipe.

Prep Time5 minutes

Steeping Time15 minutes

Total Time20 minutes

Yield: 8 ounces

Author: Katie Wells

  • In a small pan, bring the distilled water to a boil.

  • Remove from the heat and add the dried nettle leaf and horsetail leaf.

  • Cover the pot and let the herbs sit in the water for at least 10 minutes or until the water cools.

  • Strain the herbs out and pour the herbal tea into a spray bottle.

  • Add the aloe vera gel and essential oils and shake well.

  • Store in the refrigerator and shake well before use.

  • Spray liberally on hair roots once or more per day. I found that it was easiest and worked the best to spray on before bed each night.
  • This hair serum will last about 1 week if stored in the fridge. You can also freeze some if you want to make a bigger batch for later. 

How to Use Scalp Serum For Hair Growth

Apply a small amount of serum to the scalp and massage gently. Focus on your scalp and hair roots. Massage increases circulation, which helps deliver nutrients to follicles. I sprayed this scalp serum on every night before bed. You can use it on either wet or dry hair. 

What Is the Most Effective Hair Growth Serum?

The “most effective” serum depends on the cause of hair loss. Rosemary oil has emerging research and is a popular natural alternative. Herbal and essential oil–based serums, like this DIY recipe, work best as part of an overall approach that includes nutrition, stress management, and hormone support.

So, which hair serum can regrow hair? Regrowth actually depends on follicle health. A serum can support follicles that are dormant or weakened, but it’s much harder to revive inactive follicles. That’s why early intervention and addressing root causes are important.

Final Thoughts on Hair Growth Serum

Hair loss can feel discouraging, especially when it’s tied to postpartum changes, stress, or illness. While hair loss is common in life, we don’t have to take it lying down. It’s so important to address the root causes, but using a hair growth serum can also be really helpful in the meantime. 

I love this hair growth serum because it’s simple with nourishing ingredients and I noticed a definite difference from it. 

How do you support healthy hair? What products have you tried? Leave a comment and let us know!

Tags: , , , , ,
5 simple skincare habits everyone should follow

5 simple skincare habits everyone should follow

What’s the story

Maintaining healthy skin doesn’t have to be complicated or expensive.
In fact, simple habits can make a world of difference in your skin’s appearance and health.
By incorporating these easy practices into your daily routine, you can achieve clearer, more radiant skin without the need for costly products or treatments.
Here are five straightforward habits that anyone can adopt to improve their skin care routine effectively.

Stay hydrated throughout the day

Drinking plenty of water is essential for keeping your skin hydrated and healthy.
Water helps flush out toxins from the body and keeps your skin cells well-hydrated.
Aim for at least eight glasses of water a day to maintain optimal hydration levels.
This simple habit can help reduce dryness and improve the elasticity of your skin.

Cleanse your face daily

Cleansing your face every day is a must to get rid of dirt, oil, and impurities that accumulate on the skin.
Use a mild cleanser suited for your skin type to avoid stripping natural oils.
Cleanse twice a day, once in the morning and once before bed, to keep pores unclogged and prevent breakouts.

Moisturize regularly

Moisturizing is key to keeping your skin’s moisture barrier intact.
Even if you have oily skin, don’t skip this step; use a lightweight moisturizer that suits your type.
Applying moisturizer after cleansing helps lock in moisture and keeps your complexion smooth and supple.

Protect your skin from sun exposure

Sun exposure can cause premature aging and damage to the skin.
To protect yourself, apply broad-spectrum sunscreen with at least an SPF of 30 every day, even when it’s cloudy outside.
Reapply every two hours when outdoors for extended periods to ensure maximum protection against harmful UV rays.

Get enough sleep each night

Sleep is essential for the body to repair itself, including the skin.
Aim for seven to nine hours of quality sleep every night.
This gives your body enough time to regenerate cells and repair damage caused by daily stressors, like pollution or UV rays.

Tags: , , ,
Glutathione And Vitamin C: Is It A Good Combo For Skin?

Glutathione And Vitamin C: Is It A Good Combo For Skin?

Glutathione and Vitamin C are two of the most powerful antioxidants in skincare. They have become a go-to solution for many skin concerns, such as dullness and premature ageing. The result you get from using them is a healthy complexion. If you are struggling with clearing dark spots or simply want to make your skin look alive, you may have come across these names.

The common question is whether using Glutathione and Vitamin C is effective when you use them together. Or, should you use them separately as a Glutathione serum and Vitamin C serum? This guide explores how this combination works and how to use it correctly for the desired results.

What Is Glutathione and Vitamin C?

It will be easier to understand the reasons for using them together if you know what each ingredient does on its own.

Glutathione: The Master Antioxidant

Glutathione is a naturally occurring antioxidant in the human body. It helps with detoxification and keeping your cells healthy. In skincare, it is widely known for its ability to brighten the skin. It can also target pigmentation, uneven tone, and environmental damage when you use it on your face. It works by inhibiting the enzyme that produces melanin, which can fade dark patches to give you an even complexion.

Vitamin C: The Glow Booster

It is the most popular brightening ingredient in the beauty world. Its antioxidant properties boost collagen production, improve skin texture, and promote natural radiance. It is particularly good at fading existing dark spots and protecting the skin from “free radicals”. They are present in pollution and the sun that cause wrinkles and dullness.

Should You Use a Glutathione Serum with Vitamin C?

The direct answer is yes. Using a Glutathione serum with Vitamin C can improve your results compared to using them alone. In fact, they support each other.

Why This Combo Works Well

The secret is how they interact with each other. Vitamin C recharges Glutathione. When Glutathione neutralises a free radical, it becomes inactive. That is when Vitamin C steps in to convert it back into its active form so that it can continue protecting your skin. This means the combination of Glutathione and Vitamin C works on your skin for much longer.

Key benefits are listed below.

  • Double Brightening: Both ingredients work to reduce melanin to give you a more natural and healthy glow.

  • Fades Pigmentation: The duo clears up dark spots and acne marks remarkably well.

  • Environmental Shield: They provide stronger antioxidant protection against the sun and pollution.

  • Anti-Ageing: They keep your skin firm and smooth by boosting collagen.

Modern formulations combine both ingredients into a single Vitamin C and Glutathione serum, which makes it easy to get the Glutathione serum benefits. Also, your routine becomes simple as you only have to use one serum.

How to Use Vitamin C and Glutathione Serum Correctly

You should use Vitamin C and Glutathione serum for face when your skin is most exposed to environmental stress to get the most out of it, which is in the morning.

Morning Skincare Routine

  1. Gentle Cleanser: Start with a clean base.

  2. Vitamin C and Glutathione Serum: Apply 3-4 drops to your face and neck.

  3. Lightweight Moisturiser: Lock in the benefits of the serum and keep your skin hydrated.

  4. SPF 50 Sunscreen: This is the most important step, so do not skip it.

It is essential to use SPF 50 sunscreen when you are using these antioxidants. Glutathione with Vitamin C repairs your skin, but the sun can easily reverse those results if you skip protection. Sunscreen prevents new UV damage and pigmentation from returning, so always end your morning routine by applying a liberal amount of SPF to protect your skin.

Who Can Benefit from Glutathione and Vitamin C?

The beauty of Glutathione and Vitamin C is that the combination is quite versatile. It is ideal for those dealing with the following skin problems.

  • Dull or tired-looking skin: If your skin looks grey or lacks life

  • Uneven skin tone: If you have dark patches or sun spots on your skin

  • Early signs of ageing: If you want to prevent fine lines before they settle in

  • City dwellers: If your skin is exposed to smog and pollution most of the time

Most skin types can tolerate this combination well, but it is still better to test a small amount on your jawline first. If you have very sensitive skin, do not use it unless you do a patch test.

Final Thoughts

Combining Glutathione with Vitamin C is the smartest move you can make for your skincare routine. They can brighten the skin, but also work together to keep each other active for longer. If you are looking to improve the appearance of your skin, then giving this serum a chance is worth it. You can achieve a clearer and more radiant complexion by using a high-quality product.

Tags: , , , ,
The Beauty Brand That’s Giving Time Back

The Beauty Brand That’s Giving Time Back

In an era where skincare routines have turned into ten-step commitments, Terrai is asking a simple but radical question: what if beauty gave you time back instead of taking more of it?

Advertisment

 Founded in 2024 by Dhruv Kumar and Kamakshi Sood, this homegrown Indian skincare brand isn’t trying to win the race for novelty. Instead, it’s carving out space for something far more precious: efficiency. Terrai’s philosophy is rooted in the reality of modern life, where long routines often feel less like self-care and more like another task on the list.

 “At Terrai, we believe that skincare should simplify your life, not add to it,” says Sood. “Our products are developed to deliver potent benefits with fewer steps, giving customers time back in their day without compromising on performance.”

 Skincare, minus the overwhelm

At the heart of Terrai is a belief that effective skincare doesn’t need layers, excess, or hype. Kumar and Sood set out to build a brand that prioritises performance and transparency over trends. The goal was never to flood the market with more products, but to create formulations that do more, faster and smarter.

Advertisment

Rather than asking consumers to decode complicated regimens, Terrai’s approach is refreshingly minimal. Each product is designed to multitask, delivering multiple benefits in a single step. The result is routines that feel intuitive, not intimidating.

“Our focus has always been on creating products that work harder so people don’t have to,” adds Kumar. “Efficiency, for us, isn’t about cutting corners; it’s about thoughtful formulation.”

Where science meets simplicity

What truly sets Terrai apart is its science-first mindset. The brand leans heavily on clinical validation, choosing measurable results over exaggerated claims. Every formula is built with intent–it’s modern yet grounded in dermatological research.This focus on precision has allowed Terrai to position itself as something more than a beauty label. It sees itself as a time-saving company, one that understands the demands of contemporary life and responds with products that respect it.

 Multi-tasking, done right

 Terrai’s growing portfolio reflects this philosophy clearly. Its Luminous Tinted Sunscreen, for instance, functions as protection, hydration, coverage, and primer—all in one clinically backed formula. The Aqua Radiance Sunscreen offers high protection in an ultra-light texture designed to prevent tanning without weighing skin down.

 Then there’s the SPF face mist, a hybrid product that combines sun protection with long-lasting hydration and age-supporting actives, ideal for days when reapplication needs to be effortless. The newest launch, One & Done, distils Terrai’s ethos most succinctly: a multi-corrective serum created to address the most common skin concerns from a single bottle.

 “One & Done was created for people who want results, not routines,” says Sood. It’s a sentiment that echoes across the brand’s entire lineup.

 A new definition of luxury

 In many ways, Terrai’s restraint feels luxurious. In choosing to do less, but better, the brand reflects a shift in how beauty is being redefined. Not as an elaborate ritual, but as something that fits effortlessly into daily life.

 In a crowded skincare landscape obsessed with what’s next, Terrai’s strength lies in knowing when enough is enough. And sometimes, the most indulgent thing a beauty brand can offer is time itself.

Tags: , , ,
Beef Tallow for Skin and Its Role in Natural Skincare

Beef Tallow for Skin and Its Role in Natural Skincare

Beef tallow has been used in traditional skin care for generations, long before modern cosmetic products became widely available. Today, many people are returning to this simple ingredient as part of a more mindful approach to skin health. Beef tallow for skin is valued for its ability to support moisture, protect the skin barrier, and fit easily into a simplified skincare routine.

Unlike many commercial moisturizers, beef tallow skincare relies on ingredients that closely resemble the skin’s natural oils. This similarity allows it to work with the skin rather than disrupting its balance.

What Is Beef Tallow and Why Is It Used for Skin

Beef tallow is rendered fat obtained from cattle, usually from grass fed sources. When properly prepared, it becomes a smooth and stable fat that has been traditionally applied to protect and nourish the skin. One of the reasons beef tallow for skin is effective is because its fatty acid profile is similar to human sebum.

This compatibility helps the skin recognize and absorb it more easily. Instead of sitting heavily on the surface, tallow skin products tend to support the natural structure of the skin barrier, which is essential for maintaining hydration and comfort.

How Beef Tallow Moisturize and Protect the Skin Barrier

Healthy skin depends on a strong barrier to retain moisture and defend against environmental stress. Beef tallow moisturizes the skin by replenishing lost lipids rather than masking dryness with water based formulas. This can be especially beneficial for people dealing with tight, flaky, or irritated skin.

Because it is free from synthetic fillers, beef tallow skincare often feels more nourishing with less product. A small amount is usually enough to create a protective layer that helps prevent moisture loss throughout the day or night.

Nutrients Found in Beef Tallow Skincare

Beef tallow naturally contains fat soluble vitamins such as A, D, E, and K. These nutrients play a role in maintaining the appearance and resilience of the skin. While beef tallow for skin should not be viewed as a medical treatment, these naturally occurring components support the skin’s normal renewal process.

This nutrient content is one reason many people prefer tallow skin products over heavily processed creams that rely on synthetic additives.

Beef Tallow in a Simple Skincare Routine

Incorporating beef tallow into a skincare routine does not require multiple steps. It is most effective when applied to clean, slightly damp skin. Warming a small amount between the hands allows it to spread evenly and absorb more comfortably.

Beef tallow skincare works well as a final step to seal in moisture, especially during colder months or in dry climates. Its versatility also makes it suitable for use on the face, hands, lips, and other dry areas.

Beef Tallow vs Conventional Natural Skincare Products

Many natural skincare products still rely on long ingredient lists and preservatives to maintain shelf life. Beef tallow stands apart because of its natural stability and minimal processing. This simplicity can be appealing to people who experience irritation from fragrances or synthetic compounds.

Compared to conventional lotions, beef tallow moisturize without relying on emulsifiers or artificial thickeners. This makes it a practical option for those seeking fewer ingredients and more transparency in their skincare choices.

Who Can Benefit Most From Tallow Skin Products

Beef tallow for skin is particularly suited for individuals with dry, sensitive, or compromised skin barriers. People who struggle with seasonal dryness or environmental stress often find relief when switching to simpler formulations.

Those interested in learning more about responsibly made beef tallow skincare can explore options from trusted sources that emphasize traditional preparation methods and ingredient quality.

Things to Consider Before Using Beef Tallow

While beef tallow moisturize effectively for many skin types, it may not suit everyone in the same way. Individuals with very oily skin should start with small amounts and observe how their skin responds. Patch testing is always recommended before applying any new product to the face.

Using beef tallow as part of a balanced skincare routine allows the skin to adjust gradually without overwhelming it.

Why Beef Tallow Fits Into the Natural Skincare Movement

The growing interest in natural skincare products reflects a shift toward simplicity and sustainability. Beef tallow uses an existing byproduct and transforms it into a functional and nourishing skincare ingredient. This aligns with a more mindful approach to consumption and skin care.

Final Thoughts on Beef Tallow Skincare

Beef tallow is not a trend driven solution, but a time tested ingredient that continues to earn trust through its simplicity and effectiveness. By supporting the skin barrier, providing lasting moisture, and reducing unnecessary ingredients, beef tallow skincare offers a practical alternative for those looking to simplify their routine.

When used thoughtfully and sourced responsibly, beef tallow can become a reliable part of everyday skin care without complexity or exaggeration.

Tags: , , , , ,
Homestead Blog Hop - Homestead tips, ideas, animal care, and recipes every Wednesday

Homestead Blog Hop 586 – Valentine’s, Strawberry Cake, and Fresh Bread

Welcome to Homestead Blog Hop, a weekly gathering for homesteaders and simple living enthusiasts to share DIY projects, from-scratch recipes, and creative inspiration. This week’s hop features cozy homesteading tips, along with practical ideas that celebrate handmade living and self-sufficiency.

Whether you’re looking for seasonal crafts, homemade treats, or encouragement on your homesteading journey, you’ll find plenty of inspiration to carry into the new year. Grab a cup of tea, explore the featured posts, and join us in sharing your own homestead creations.

Meet Your Homesteading Hosts

We’re Kelly from Simple Life Mom, Liz from The Cape Coop, Natasha from Houseful of Nicholes, and Laurie from Ridgehaven Homestead. Together, we’re passionate about from-scratch living, simple ingredients, frugal habits, and intentional homesteading. We’re delighted to host the Homestead Blog Hop, where you can find fresh inspiration each week for DIY projects, homemade recipes, and practical simple living ideas.

Follow Us for More Homestead Inspiration

Natasha – Houseful of Nicholes
Facebook | Pinterest | X | Instagram

Laurie – Ridge Haven Homestead
Facebook | Pinterest | Instagram

Liz – The Cape Coop
Facebook | Pinterest | X | Instagram

Kelly – Simple Life Mom
Facebook | Pinterest | X | Instagram

FEATURED POSTS from the Last Homestead Blog Hop

Each week, we take turns selecting three featured posts from the Homestead Blog Hop. These features are shared across all of our social media platforms, helping spotlight the creativity and hard work of our fellow homesteaders. Here are the featured posts from last week’s hop:

1. Le Creuset No Knead Bread from Walking on Sunshine Recipes

2. Creamy and Slightly Tangy Strawberry Dump Cake Recipe from Recipe Idea Shop

3. 4 Free Heart Box Template Printables for Valentine’s Day from Press Print Party

Congrats! Feel free to grab the featured on button for your post.

Just right click and ‘save image as…‘

Guidelines for the Homestead Blog Hop

  1. Click the “Add Your Link” button below and upload a clear, eye-catching image from your project or recipe. Please link directly to the family-friendly post itself, not your blog’s homepage.
  2. You may link up up to three posts each week.
  3. Take time to visit a few other blogs in the hop and leave a thoughtful comment to let them know you stopped by. Community support makes this hop special!
  4. Please include a link back to the Homestead Blog Hop in your post. Posts without a backlink are not eligible to be featured. All featured posts are shared across all hosts’ social media channels.
  5. Share posts that haven’t been linked to the hop before. Older posts are welcome as long as they are new to the hop.
  6. By joining the Homestead Blog Hop, you grant the hosts permission to use one image from your post, with a link back to your site, if your post is selected as a feature next week.
  7. This is a family-friendly link-up designed to encourage, inspire, and support the homesteader in all of us.

Let the Party Begin!

Which project are you excited to try this week? Leave a comment below.

Join Our Homestead Blog Hop Pinterest Board

Follow all of your hosts on Pinterest and send a message if you’d like to be added to our Homestead Blog Hop group board. This board is a great place to share your DIY projects, crafts, and from-scratch recipes with the homesteading community.

Guideline: Only pin posts that you’ve linked up to the Homestead Blog Hop.

Tags: , , , , , , ,
Best oLive
Privacy Overview

This website uses cookies so that we can provide you with the best user experience possible. Cookie information is stored in your browser and performs functions such as recognising you when you return to our website and helping our team to understand which sections of the website you find most interesting and useful.